Welcome to the Dr. Galva information section
Here you will find answers to the most frequently asked questions about our electroplating range. Whether you want to find out more about our products or the ordering process - you will find comprehensive information on this page. However, if you have a question that is not answered here, please do not hesitate to contact us.
You can find the Electroplating Guide here:

If you are interested in information about the latest developments or other publications, then take a look at the publications section: Publications
- What is the difference between bluing and patination?
-
The difference between bluing and patination lies in the processes, materials, and final results, although both aim to create a protective or decorative finish on metal:
Bluing:
- Process: A chemical process where iron or steel is transformed into a black or dark blue layer (oxide layer) through reaction with oxidizing chemicals.
- Materials: Typically used on steel and iron.
- Final result: Produces a dark, matte, or slightly shiny surface that serves as corrosion protection while also being visually appealing.
- Use: Commonly used on firearms, tools, or other steel parts to protect them and provide a dark appearance.
Patination:
- Process: A chemical or natural process where metals like copper, bronze, or brass oxidize and form a colored surface (patina).
- Materials: Primarily used on copper, bronze, and brass.
- Final result: Often creates green, blue, or brown tones (e.g., the famous green patina on copper roofs), which are usually decorative and also serve as a protective layer.
- Use: Frequently applied in art, sculptures, or architecture to give a piece an antique or aesthetically aged look.
In summary: Bluing is mainly used on steel to create a dark, functional protective layer, while patination is applied to copper and similar metals to create a decorative, colored surface.
- How can I blacken brass through bluing? Which product do you recommend for this?
-
For blackening brass, patination is the best method. The Patination gel Nero is specifically designed to give brass a dark surface. It is easy to apply and ensures a durable, decorative patina.
When diluted, you can also achieve brown tones very well.
- What are the differences between the black oxides?
-
Dr Galva's black oxides differ primarily in the way they are applied and their specific uses. Here are the main differences between the three types:
1. Ultra-3 dip black oxide
- Application: Dip black oxide is ideal for processing multiple workpieces at once or for complex shapes that require a uniform coating. With this method, the entire workpiece is immersed in the burnishing solution.
- Advantages: This method ensures an even, continuous black oxide finish, even in hard-to-reach areas. It is particularly suitable for larger workpieces and industrial applications.
- Areas of application: Optimal for black oxide treatment of steel parts in mass production or in workshops where many parts need to be treated at the same time.
2. Ultra-5 quick black oxide
- Application: This universal black oxidiser is versatile and can be applied either by dipping or by simple application. It is suitable for a wide range of materials and workpieces.
- Advantages: This black oxide offers flexibility in application and is an excellent all-round solution for various projects. It is easy to handle and requires no special equipment.
- Areas of application: Perfect for craftsmen and DIY enthusiasts looking for a versatile solution for various burnishing tasks, whether for small or large parts.
3. Ultra-7 swipe black oxide
- Application: With swipe black oxide, the solution is applied directly to the surface of the workpiece, for example with a brush or cloth. This method is particularly suitable for processing small areas or for touch-ups.
- Advantages: This method enables precise and controlled application, ideal for repairs or for workpieces that cannot be completely immersed. It is quick and easy to use, even in situ.
- Areas of application: Suitable for smaller projects, repairs or to refresh existing black oxide finishes. It is ideal for craftsmen who want to treat specific areas without having to treat the entire workpiece.
Summary:
- Dip black oxide: For even and complete coatings on multiple or large workpieces.
- Quick black oxide: Versatile use, both by dipping and by application, for various materials.
- Swipe black oxide: Precise and easy application for smaller areas or touch-ups.
Each of these bluing methods from Dr. Galva offers specific advantages and is optimised for certain areas of application, so you can choose the right method for every task.
Dr. Galva's black oxides are specially developed for steel, iron or cast iron. There are also black oxides that are suitable for alloys such as copper or brass - these are then patinations. - Which oil to use after blackening?
-
After blackening, we recommend using a special anti-corrosion oil that has been developed for black oxidised surfaces. Here are some options:
- Special blackening oils: These oils are specially formulated to seal and protect blackened surfaces. They provide a high level of corrosion protection and preserve the black finish.
- Gun oil: Gun oil, as used for the care of firearms, is a good choice. It is designed to protect metal surfaces from corrosion and is therefore also ideal for blackened parts.
- Linseed oil: Linseed oil is also suitable for natural protection, forming a thin protective layer while highlighting the black oxide. However, it is less durable than specialised oils.
- Mineral oil: A light mineral oil can also be used, especially if no specialised blackening oil is available. It provides basic protection against moisture, but may not be as effective as more specialised products.
It is important to apply the oil evenly and thinly to ensure an even protective layer and to wipe off any excess oil after a few minutes so that the surface does not remain sticky.
- How to dry after black oxidising?
-
Dry the parts with a clean, lint-free cloth immediately after black oxidising, otherwise corrosion may form.
Regarding the waiting time after black oxidising: It is important that the black oxide is completely finished and the surface is dry before you start painting. As a rule, a short waiting time of around 30 minutes to 1 hour is sufficient to ensure that the surface is stable. If the humidity is high, it may be advisable to wait a little longer or carefully heat the parts to speed up the drying process. - Is it also necessary to oil the blackened parts if they are then painted?
-
The primary purpose of oiling the blackened parts is to provide additional corrosion protection by sealing the surface and protecting it from moisture. However, if you want to subsequently paint the black oxidized metal sheets with clear lacquer, oiling can in fact be omitted, as the clear lacquer takes over the protective layer.
In addition, the paint would not adhere properly.
- How strong is the corrosion protection of black oxide?
-
The corrosion protection of a black oxide finish is limited and usually only provides moderate protection against rust. Quick black oxide creates a thin, black oxide layer on the surface of the metal, which protects against corrosion to some extent, but is not as effective as a thicker, industrial black oxide or coating.
Factors that influence corrosion protection:
- Thickness of the layer: as the oxide layer created by black oxide is relatively thin, it only provides superficial protection.
- Environmental conditions: In humid or aggressive environments, such as in salty air, the protection provided by black oxide is often inadequate and can fail relatively quickly if the surface is not given additional treatment.
- Post-treatment: Corrosion protection can be significantly improved if the blackened surface is treated with a suitable anti-corrosion oil after application. This post-treatment seals the surface and protects it from moisture and other corrosive influences.
Summary:
Without post-treatment, black oxide only offers limited corrosion protection and is mainly suitable for decorative or temporary applications. For long-term protection, especially in demanding environments, post-treatment with oil or another protective coating is required.
- Rod anode or flat anode – which is the right one?
-
The decision between a rod anode and a flat anode depends on several factors:
1. Workpiece Size and Shape
- Flat Anode: Ideal for larger workpieces or when a uniform coating thickness over a wider area is needed. Perfect for bath electroplating.
- Rod Anode: Better for smaller workpieces or when the coating must be applied to specific areas. Perfect for pen plating.
2. Current Distribution
- Flat Anode: Provides a more even current distribution due to its larger surface area, making it ideal for uniform coatings.
- Rod Anode: Can lead to uneven deposition, particularly if the distance to the cathode is not constant. In bath electroplating, this can result in excessively high anodic current density.
3. Electrode Arrangement
- Flat Anode: Placing two opposite flat anodes symmetrically ensures a uniform metal deposition.
- Rod Anode: Should be positioned so that the distance to the workpiece remains as consistent as possible to avoid variations in coating thickness. Current always takes the shortest path!
4. Rod Anode for Pen Plating
- A rod anode is primarily used in pen plating (also called tampon plating), as it allows for a precise application of the coating.
- Ideal for touching up small areas or for workpieces that cannot be fully submerged in an electroplating bath.
5. Flat Anode for Bath Electroplating
- Flat anodes are particularly advantageous for bath electroplating because they ensure even metal deposition on larger workpieces.
- In a bath process, the workpiece is surrounded by electrolyte from multiple sides, providing a homogeneous coating.
- Two opposite flat anodes offer symmetrical current distribution and significantly improve coating quality.
Conclusion
- For a uniform coating thickness and larger workpieces → Flat Anode, especially for bath electroplating.
- For smaller or more precise coatings → Rod Anode, especially for pen plating.
- Always consider the properties of the electrolyte and the current distribution!
- What do I need for electroplating?
-
1. Power source
- An adjustable DC power supply with appropriate voltage and current for the chosen electrolyte.
2. Electrolyte solution
- A specialized electrolyte solution containing metal ions (e.g., copper electrolyte for copper deposition, nickel electrolyte for nickel plating).
3. Anode (Positive pole, +)
- Copper anode for copper plating
- Nickel anode for nickel plating
- Zinc anode for zinc electrolyte
- Aluminum anode for chromium electrolyte (alternatively platinum anode)
- Stainless steel or platinum anode for precious metals or special electrolytes
4. Cathode (Negative pole, -)
- The workpiece to be coated (e.g., metal parts, jewelry).
5. Container
- A plastic container or tank (chemical-resistant) for the electroplating bath.
6. Wires and clamps
- Alligator clips and cables to connect the electrodes to the power source.
7. Pre- and post-treatment agents
- Cleaning agents & activators (e.g., degreaser, pickling solutions – including conditioner).
- Passivation & protective agents (e.g., bluing oil) to protect the coating.
8. Safety equipment
- Gloves, safety goggles, and possibly a respirator for safe handling of chemicals.
- Which set or power supply should I choose?
-
First, you should decide what you want to achieve, meaning which final coating you want to apply.
The options are chrome, copper, nickel, and zinc.
Additionally, there are combination sets for copper/nickel, chrome/nickel, and a large set.
The chrome set is only available as a chrome/nickel combination because nickel plating is generally required before chrome plating, and the chrome layer is applied only thinly on top.
Copper under nickel is often advantageous as it significantly improves corrosion protection, helps to even out surface irregularities, or makes polishing easier.
The large set is ideal if you want to do everything.
Of course, you can repurpose any set later—just add the necessary electrolytes and anodes, and you can apply a different coating.
Next, the question is which power supply is needed. We offer a small one with a maximum of 3A and a more powerful one with 10A.
The decision depends on the size of the object to be plated. If you plan to coat larger items later, a powerful power supply (10A) is required. You will also need larger tanks and the corresponding electrolytes for bigger projects.
In electroplating, current density is a key factor, as each electrolyte has its own optimal range, specified in A/dm².
To calculate the required current, multiply the recommended current density for the specific electrolyte by the surface area of the workpiece in dm². The voltage adjusts automatically once the current is set using the current limiter (the voltage is automatically reduced until the selected current is reached).
In this table you can see the power required.
Electrolyte Output current 3A* 5A* 10A* Chromium 0,6 1 2 Copper acidic 5 8,5 17 Copper alkaline 15 25 50 Nickel 10 17 34 Zinc 12 20 40 Zinc-nickel 3,3 5,5 11 * - Details of the maximum area to be coated in dm² at the lowest possible current density
- What is electroplating?
-
Electroplating, also known as electroforming, is an electrochemical process in which a thin layer of metal is applied to another material. This process is often used to refine the surface of an object, protect it from corrosion, increase its wear resistance or improve its appearance.
This is how electroplating works:
- Preparation of the workpiece: The workpiece to be plated must be thoroughly cleaned to remove contaminants such as oil, grease or rust. This is crucial for the adhesion of the metal coating.
-
Electrolyte bath: The workpiece is immersed in an electrolyte bath containing a solution of metal ions that are to be deposited on the workpiece. The workpiece is used as the cathode (negatively charged) and a metal anode (positively charged) as the source of the metal ions.
-
Application of electric current: An electric current is passed through the electrolyte bath. The positively charged metal ions move to the negatively charged cathode, where they are deposited as a solid metal layer. The thickness and quality of the metal layer can be controlled by the strength of the current, the composition of the electrolyte and the duration of the process.
-
Finalisation: After the plating process, the workpiece is cleaned and, if necessary, polished to achieve the desired finish.
Applications of electroplating:
- Corrosion protection: metals such as zinc or nickel are applied to steel to prevent rust formation.
- Decorative coating: Precious metals such as gold or silver are applied to jewellery or decorative objects to improve their appearance.
- Wear protection: Harder metals such as chrome are applied to tools or machine parts to extend their service life.
- Electronic applications: In electronics, thin layers of metal are applied to circuit boards or contacts to improve electrical conductivity.
Electroplating is a widely used technique in industry and trade and plays an important role in numerous production processes.
- The processes of electroplating
-
In the following section, the different processes of electroplating are presented, including the basic working utensils for the individual methods. In general, a distinction is made between three different electroplating processes, namely barrel electroplating, pin/tampon electroplating and bath electroplating.
The procedures at a glance
A distinction is made between 3 processes for the electrodeposition of metals. These are bath electroplating, pin electroplating (or tampon electroplating) and barrel electroplating. Each of these processes has its advantages and disadvantages.
Procedure Advantages Disadvantages Bath plating - automatic sequence of the galvanisation process
- layer thicknesses of a few micrometres to several millimetres can be achieved
- powerful power supply unit required
- large containers necessary
- large amount of electrolyte
- impractical for plating small parts
Pen plating / Tampon plating - galvanising of large surfaces feasible
- power supply unit with low power necessary, because current only flows at small contact point
- small amount of electrolyte needed
- only low layer thicknesses achievable, thus hardly any corrosion protection
- electroplating process is not automated
- very time-consuming
- strenuous
Barrel plating - excellent for plating small parts
- relatively uniform coating due to continuous rotation
- electroplating process runs automatically
- quick to fill
- powerful power supply unit necessary
- large containers essential
- large amount of electrolyte
- workpieces receive small impact marks
- a certain number of pieces is necessary so that the workpieces are permanently contacted, or a suitable drum size
The bath electroplating processBath electroplating is a method in which the workpiece to be electroplated and the anode are immersed in an electrolyte. In addition, a current flow is generated so that metal is deposited on the workpiece.
Bath electroplating is a process that is frequently used in industry. As a rule, workpieces are chrome-plated, gold-plated or nickel-plated in tanks of enormous size. For this purpose, racks are often used on which the parts to be plated are suspended. In order to increase the possible current density and thus faster deposition, a bath movement is a good solution here. This can be done by air injection, pumping or even moving the rack.
Advantageously, the process is easy to carry out and large current flows can be generated, so that deposition of thick metal layers is also possible. A disadvantage is that large quantities of electrolyte are required to fill the baths. For this reason, bath electroplating is only suitable for smaller parts in the private or hobby sector.
Basic equipment required
To carry out the bath electroplating process, a controllable direct current source, a tank or container and connecting cables are required.
The power source can be, for example, a laboratory power supply unit, with both a volt and ampere display, i.e. voltage and current. The tank should be large enough to completely immerse the object to be electroplated. It should be made of an alkali-resistant and acid-resistant material; in addition to plastic containers, glass containers are also very suitable. They also need cables to connect the power supply to both the anode and the workpiece. To avoid confusion, always use a red cable for the (+) pole and a black cable for the (-) pole.
Anode surface
As a general rule, the surface area of the anode should be as large as the surface area of the workpiece to be electroplated. If, on the other hand, the surface area of the anode is too small, it is possible that the layers will be deposited unevenly.
This effect occurs because the current is not distributed evenly in the electrolyte (scattering) and this takes the shortest path. Thus, the current is higher in the area of the shortest path and the layer is deposited thicker here. The anode shape and arrangement must also be suitable so that the current can be distributed evenly.
A larger anode does not have a negative effect on the result. However, due to an unfavourable anodic current density (anodic efficiency), a stronger passivation (depending on the electrolyte) can take place, which reduces the current flow. If this is the case, the anode should be cleaned.
The pen or tampon plating process
If permanently mounted or large workpieces are to be electroplated, pin electroplating is best suited. For this purpose, a metal rod is used as the anode (+), at the tip of which there is either a cloth tampon or a sponge (for the sake of simplicity, we will only use the word tampon). The tampon is used to absorb the electrolyte and is completely soaked with the desired electrolyte. While the object to be electroplated is connected to the cathode (-), the workpiece is now contacted with the tampon in a circular motion. In this way, a current flow is made possible and after a few seconds a metal layer is deposited at the corresponding contact points.
The circular motion is very important because a high current flows on a small contact area. As soon as you stop on a spot with the tampon, the spot can become dull and can turn dark (burns), this effect runs faster the higher the current flow is. A little experience is needed here, but you will get it quite quickly. Moving the tampon back and forth is rather unsuitable, as the movement is briefly interrupted in between and burning can already occur at high current density.
The anode should preferably be made of inert materials such as platinum or graphite (and sometimes also stainless steel) or the material of the electrolyte used.
Basic equipment required
To carry out the process of pin or tampon electroplating or pin electroplating, a controllable direct current source, i.e. a controllable power supply unit with digital voltage and current display, a pin anode with anode holder (electroplating pin), a set of cables and a tampon or sponge are required. The pin anode (or the anode holder) must be connected to the (+) pole of the power supply unit using a cable. In addition, the anode must be fitted with a tampon or sponge so that the complete electroplating pin is ready for use. The workpiece itself is connected to the (-) pole as in the procedures explained above.
Sponge & Tampon
If sponges or tampons are used, they are attachments that absorb the electrolyte. This characteristic is indispensable because it must hold the electrolyte between the anode and the workpiece during the electroplating process and release the metal ions. Ideally, pad attachments for electroplating have a very high absorbency and are robust. Electroplating pads should also not be too thin, because otherwise there could be insulation effects due to high pressure at certain points and the electric current could not be passed on. A pad for electroplating should also not have external seams, as this could cause scratches on the metal.
Thickener or gel former
A thickener, also called a gel former, is a specific thickening agent. Thickeners are added to the electrolyte solution so that it becomes more viscous. There are special thickeners designed for the different galvanic electrolytes. If conventional agents are used or mixed in, the electrolyte usually becomes unusable. In principle, all types of electrolytes can be thickened with the help of galvanic gel formers. By thickening the electrolyte, it is ensured that the liquid does not drip, work can be done more cleanly and electrolyte can be used sparingly. However, the electrolyte should not be too thick.
To thicken an electrolyte, you should pour as much electrolyte as you expect to need into a container and add as much gelling agent while stirring evenly until the individually desired consistency or firmness is reached. Proceed carefully and slowly. Make absolutely sure that there is no excessive dust formation when using powder. If you have thickened the electrolyte too much, you can make it more liquid again by adding unthickened electrolyte.
The barrel plating process
The barrel plating process is ideal for electroplating large quantities of small parts, especially for parts that cannot be fixed on racks or can only be fixed with great effort. Basically, the electroplating process corresponds to that of bath electroplating, whereby the workpieces to be electroplated are placed loosely in a slowly rotating barrel. The workpieces are contacted with the aid of a centrally mounted contact rod, freely movable clappers (cables with conductive caps) or via suitable contact points in the drum wall; the drum is set in rotation with the aid of a motor. The resulting uniform movement ensures a relatively even coating of the small parts, but there are subtle differences, as the uncontrolled mixing means that individual parts are contacted for longer and thus receive a higher coating thickness, or this effect is also reversed (i.e. shorter contact time and lower coating thickness).
The advantage here is that it can be loaded quickly, as the parts are simply fed in loosely. The disadvantage is that the workpieces always get small impact marks because they are mixed with each other, so this process is less suitable for mirror finishes, but this is not important for screws etc. A minimum number of pieces is also necessary. Also, a minimum number of pieces is necessary to ensure that the parts are continuously contacted.
Basic equipment required
To carry out the barrel plating process you need a plating barrel. Besides a barrel, a gear motor and the mechanics are the basic components, together this is a barrel plating line. Just as for the bath electroplating process, a sufficiently strong controllable power supply unit and a set of cables are required.
Filling the electroforming barrel
As a general rule, the electroforming barrel should be filled with workpieces to a maximum capacity of between 40 and 50 percent. This ensures that the components can move freely; at the same time, jamming, jamming or even blocking is prevented. If this were to happen, no ideal coating and thus uniform electroplating could take place due to the contact points. It is essential to ensure that these also have contact with the contact pin.
Note: Balls are the optimal filling material because they cannot tilt, free movement is ensured as well as an ideal electroplating result.
- What is the relationship between voltage and current density?
-
In electroplating, voltage and current density play a crucial role in determining the quality of the deposited layer. Both parameters must be carefully adjusted to achieve a uniform and high-quality metal coating.
1. Voltage:
- Function: Voltage (measured in volts) drives the electric current through the electrolyte, transporting metal ions from the anode to the cathode (the workpiece), where they are deposited as a metal coating.
- Effect: Excessive voltage can cause the metal ions to deposit too quickly, resulting in a rough, porous, or even powdery layer. On the other hand, too low voltage can cause slow deposition, reducing the process efficiency and leading to an uneven coating.
- Dependence on distance: Voltage must be adjusted according to the distance between the anode and cathode, as the electrical resistance of the electrolyte increases with distance. The further the anode is from the cathode, the higher the voltage must be set to achieve sufficient current density. The voltage values on our electrolytes are guidelines based on a distance of about 10 cm. If this distance varies, the voltage should be adjusted accordingly.
- Maximum values: Note that the specified maximum voltage values can often only be reached under ideal conditions, such as when using bath movement (e.g., stirring or pumping), which ensures the electrolyte circulates evenly around the workpiece, preventing hotspots or uneven deposition.
2. Current Density:
- Definition: Current density is the current per unit area of the electrode, expressed in amperes per square decimeter (A/dm²). It describes the ratio of electric current to the electrode surface area and is a key factor in the quality of the metal deposition.
- Effect on the cathode (workpiece): The cathodic current density significantly affects the coating quality on the workpiece (cathode). Each electrolyte has an optimal current density range within which deposition occurs with good results. Excessive current density can lead to rough, coarse-grained layers, while too low current density can result in insufficient or uneven coatings.
- Effect on the anode: Anodic current density is critical for maintaining electrolyte stability. Ideally, the metal at the anode (usually the same metal being deposited) dissolves at the same rate it is deposited at the cathode. This ensures a uniform metal ion concentration in the electrolyte, contributing to the longevity of the bath. In practice, deviations often occur, affecting electrolyte stability and process efficiency.
- Adjustment through temperature and movement: Higher current densities can be achieved by increasing the temperature and moving the electrolyte or workpiece. These measures improve ion transport and help make the deposition more uniform and effective.
- Dependence on workpiece and anode shape: Current density also varies depending on the shape of the workpiece and anode. Since current tends to take the shortest path, uneven current distribution can lead to uneven coatings, especially on corners, edges, or complex geometries. Careful adjustment of the anode to match the workpiece, along with the use of auxiliary electrodes, can help mitigate this issue.
- Optimization: A careful adjustment of the anode to the shape of the workpiece, along with the use of auxiliary electrodes, can help achieve uniform current distribution, ensuring a homogeneous coating.
Interaction Between Voltage and Current Density:
- Voltage and current density are interconnected: Higher voltage generally leads to higher current density, provided the resistances in the system (such as electrolyte resistance and surface properties) remain constant.
- Voltage adjustment is often necessary to achieve the desired current density, but other factors, such as electrolyte concentration and temperature, also affect this relationship.
Summary:
- Voltage drives the process and influences the speed of metal deposition. It must be carefully adjusted, especially considering the distance between the anode and cathode, to ensure an even coating.
-
Current density determines the amount of metal deposited per unit area and affects the quality and appearance of the coating. It must be carefully set to the optimal range to achieve a high-quality coating.
- Both cathodic and anodic current density play a crucial role: Cathodic current density affects layer quality, while anodic current density ensures electrolyte stability. Temperature and bath movement management can help achieve higher current densities and improve process stability.
- Characteristics of the individual layers
-
Each of the applied layers offers certain properties that ultimately have a positive effect on the quality of the end result. Although coating with copper is not absolutely necessary for many materials, it leads to a better quality result.
Copper deposits quickly and ensures a particularly smooth surface. It is also very easy to polish, which significantly reduces polishing costs. Nickel increases the corrosion resistance of the entire coating. During subsequent chrome plating, it contributes significantly to the shine of the chrome layer.
The final thinly applied layer with the desired decorative or technical benefit forms the finishing touch.
- Corrosion protection of the coatings
-
Good corrosion protection is only achieved with a sufficiently thick layer or with an appropriate combination of layers. A thin layer of chromium on iron will offer almost no protection, so use at least the combination nickel-chromium. Another advantage is the nickel layer underneath, because the nickel (bright nickel) brings out the shine better. If you also want to improve corrosion protection in a reducing atmosphere, use the layer combination copper-nickel-chrome, as the copper does a better job here.
In general, the following applies:
Depending on the metal formed, the corrosion protection is very different. There are also big differences depending on the different types of electrolytes. Quite a few types deposit with microscopically fine pores - in these areas the protection is not present. To close the pores, higher layer thicknesses are necessary. A combination of several layers improves the protection considerably. The different layers complement each other and the corrosion protection increases exponentially, true to the motto "1+1=5".
Examples of corrosion protection
Nickel:
A pure nickel layer only has good corrosion protection from 25µm, but in the layer combination nickel-chrome or also copper-nickel-chrome, the protection is greatly improved.
Zinc:
A coating thickness of around 10µm is recommended for zinc. Zinc has a long-distance effect, which also provides cathodic protection for uncovered iron areas (e.g. pores or mechanically damaged areas).
Zinc-nickel:
Here the combination of 2 protective elements comes together. On the one hand the active zinc and the passive nickel. Both elements form a common layer with increased protection. The average layer thicknesses are between 5µm and 10µm. The layers are corrosion resistant even at temperatures of up to 180°C, which is why zinc-nickel layers are ideal for protecting components of combustion engines.
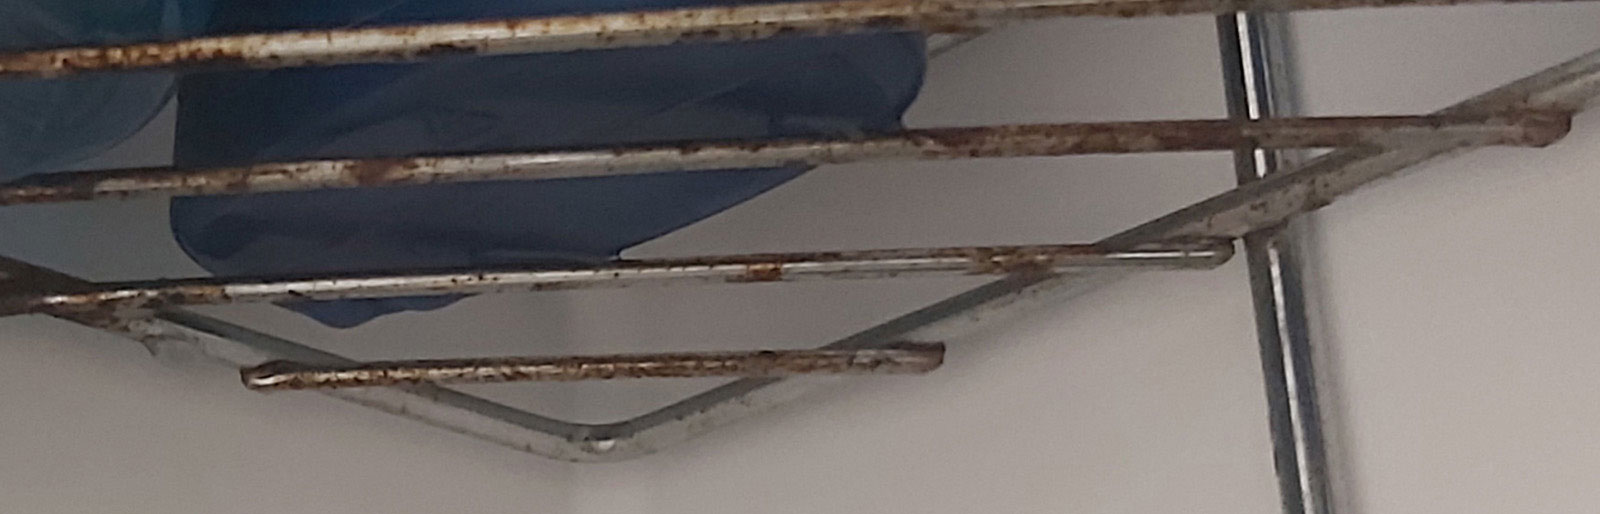
Here in the example, a chromium-plated frame, with an obviously insufficient layer thickness, or unsuitable design of the base layer:
- Sequence of the coating
-
The coating of a workpiece normally takes place in several steps, whereby different layers are deposited on the surface of the object. Each of these layers has important properties for a professional result.
Depending on the material and the condition of the surface, pre-treatment is required. For example, acid-sensitive materials such as zinc require a layer applied with alkaline copper plating solution before coating with acidic copper electrolyte. Aluminum is pre-treated with aluminum activator and copper requires a thin layer of palladium before the nickel layer is applied without current.
Practical structure of the layer sequence after pre-treatment:
- Glossy copper for good leveling
- Nickel as a diffusion barrier layer
- Gold, silver or chrome as a final layer
The last layer is normally only applied thinly.
- Scattering in the galvanising process
-
Here we address the very important scattering to be observed. The anode should be adapted to the shape of the workpiece to be coated. Only more current flow alone would cause it to become dark and dull in places that are closer to the anode.
Good scattering (e.g. copper acidic) when using a flat anode. The smaller the distance, the more current flows at these points and more metal is deposited there. Due to the good scattering, a thin layer is nevertheless deposited on the back. Poor scattering (e.g. zinc weakly acidic). Here, metal is only deposited on the side facing the anode. Practically no current flows on the rear side and no deposition takes place there, or only minimally.
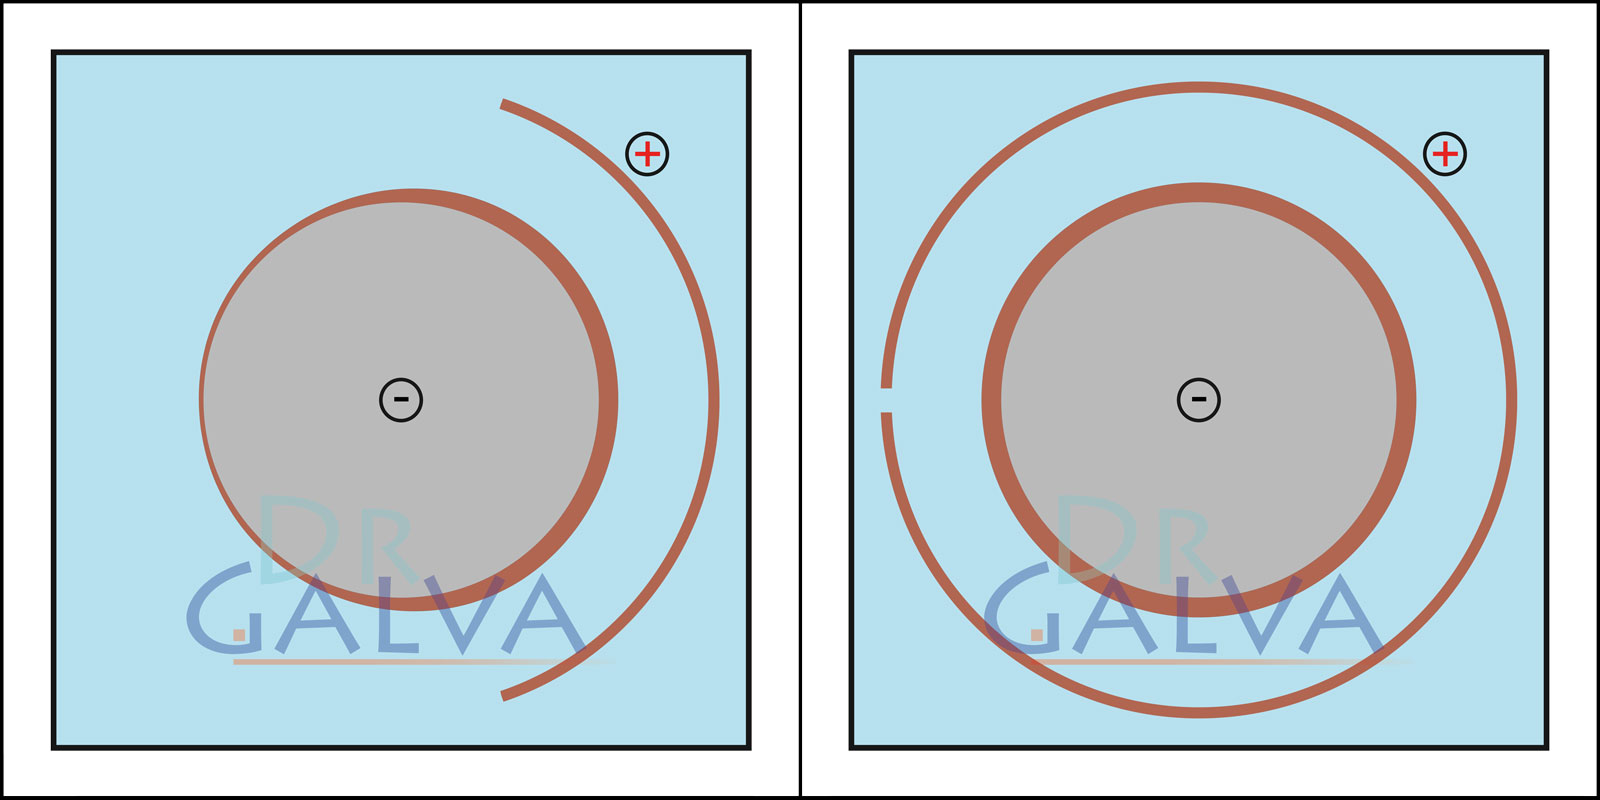
With a shape adapted to the workpiece, the metal deposits much more evenly. On the side facing away from the anode, the layer becomes thinner. Overall, the layer becomes much more uniform compared to a flat anode. A ring anode and the workpiece are found in the galvanic bath. This ensures that the anode distance to the workpiece is the same all around. To achieve uniform deposition, it is not necessary to rotate the workpiece
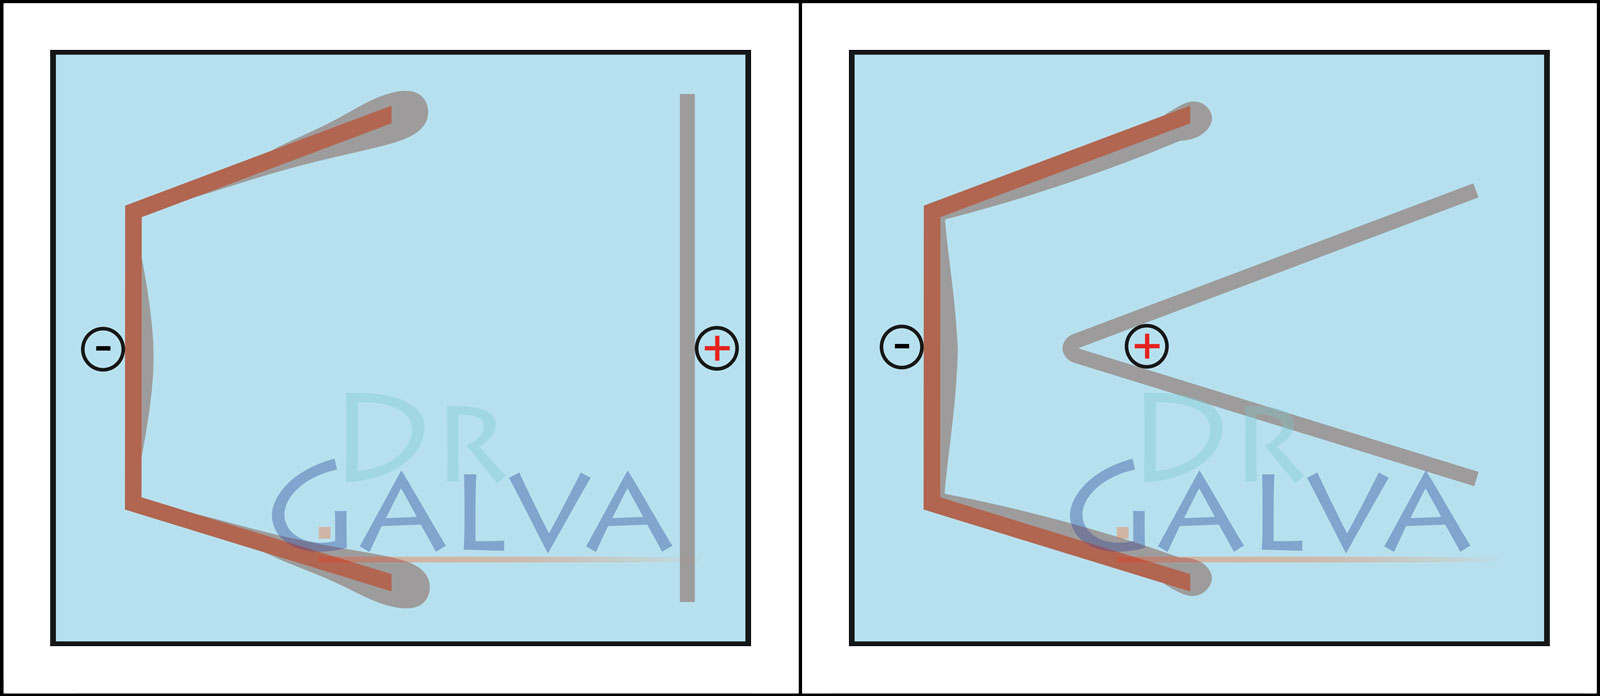
This is the most complicated form, the metal is almost only deposited in the area facing the anode. With an anode adapted to the mould, there is still good deposition on the inside, and the corners are also coated. However, this is quite time-consuming. - Why is the metal content relatively unimportant?
-
The metal-ion content (e.g., Cu²⁺, Ni²⁺, Zn²⁺) is undoubtedly an important control parameter of an electroplating electrolyte – but it is only one of many, and in practice it is almost never the limiting factor for deposit quality, economics, or process stability. The key reasons:
Why it isn’t “the most important” What (at least) matters just as much 1. Limited impact beyond a minimum
Even at moderate concentrations, ion supply at the cathode is saturated. Higher metal levels yield only a small current-density gain, but increase density, viscosity, and sludge formation.Current density & distribution
Over 90 % of deposit defects (burning, spots, pores) are driven by local current density – governed by geometry, spacing, agitation, and auxiliary anodes, not by the metal content.2. Crystal structure is governed by additives
Brightness, grain size, internal stress, and ductility arise from ppm levels of organic carriers, brighteners, levelers … entirely independent of whether the bath contains 20 g L⁻¹ or 30 g L⁻¹ Ni²⁺.Additive chemistry & breakdown products
The carrier/brightener ratio alters the deposit far more than ±20 % Ni²⁺. Analytical lists usually track > 10 organic parameters but only one metal parameter.3. Conductivity comes mainly from the salt matrix
Ohmic losses are determined predominantly by sulfate, chloride, or fluoborate ions. A silver bath contains only 2–3 g L⁻¹ Ag⁺ yet achieves high conductivity thanks to 150 g L⁻¹ KCN.Conductivity ions & pH
pH controls hydrogen evolution, brightness, and stress; buffer systems (boric acid, citrate) stabilize the electrolyte and the deposit.4. Thermodynamics vs. kinetics
Metal content hardly changes ΔG; deposition kinetics are dominated by temperature, agitation rate, and complexation (EDTA, tartrate …).Temperature & hydrodynamics
A fluctuation of ±5 K often affects thickness distribution more than ±20 % in metal.5. Bath life & cost drivers
In Cu and Ni baths, metal-ion costs are < 20 % of total cost per m² of deposit; additive make-up, energy, cleaning, wastewater & analytics are higher.Contamination management
Trace Cu in Ni baths or saccharinate breakdown can ruin a bath even when the metal content is “ideal”.6. Metal content does not define the “run length”
In self-replenishing electrolytes, anode dissolution continuously replaces the plated-out metal. The bath’s run length is therefore limited by additive degradation, dirt ingress, and volume loss – not by the initial metal content.Anode material & dissolution mechanics
Anode purity, chloride level (in Cu-OP baths), and the proper current-density window determine how efficiently Cu, Ni, Zn, etc. dissolve back. A well-run bath keeps its metal level constant for months, while organic additives must be replenished regularly.Conclusion: Metal-ion content is only the foundation of the electroplating process. For deposit quality, stability, and economics, current-density management, additives, hydrodynamics, temperature control, anode dissolution, and contamination are far more decisive.
- Soluble anodes - advantages, practice, limitations
-
Soluble anodes are made of the metal to be deposited and dissolve under current. This replenishes metal ions in the electrolyte proportional to the current flow - keeping the bath composition more stable without constantly dosing metal salts.
Advantages of soluble anodes
- Self-replenishment of metal ions: Anode dissolution ≈ metal deposition → less need for metal-salt make-up.
- No anion “salting-up”: Instead of introducing sulfate/chloride with each make-up, only metal enters the bath → smaller changes in conductivity and volume, fewer corrections.
- More stable pH/redox conditions: Oxidation proceeds via metal dissolution, not water/chloride → less O₂/Cl₂ evolution, lower additive oxidation.
- Lower cell voltage, better energy efficiency: Metal dissolution generally requires lower anode potentials than oxygen evolution.
- More consistent deposit quality: More uniform metal activity promotes uniform brightness, grain refinement and deposition rate.
- Shop-friendly: Less chemical handling, fewer stoppages thanks to longer make-up intervals.
Typical practice
- Nickel: Sulfur-activated Ni anodes / Ni pellets in Ti basket + some chloride to avoid passivation.
- Copper (acid): Phosphorus-containing (phosphorized) Cu anodes + anode bags for sludge retention.
- Tin, zinc, etc.: Widely used with soluble anodes.
Limits / disadvantages
- Anode sludge & passivation → anode bags, filtration, appropriate anode current density required.
- Metallic impurities may co-dissolve (anode quality matters).
-
Not always suitable:
- Chromium(VI) baths operate with insoluble anodes (no metal-ion increase; different electrochemistry desired).
- Chromium(III) baths: Using chromium metal anodes can generate Cr(VI) and damage the electrolyte; Cr(III) is also depleted by deposition, limiting bath life.
- Why Shine Refresher if the bath is already replenished by the anodes?
-
In short: Anodes supply (almost only) metal ions - brightness comes from organic additives. These additives are not formed at the anode and are continuously consumed or degraded in operation. That’s why the bath needs regular brightener replenisher.
Why anode replenishment isn’t enough
- Anodes dissolve metal (e.g., Ni²⁺, Cu²⁺), keeping the metal concentration constant. Organic additives (carrier/suppressor, brightener/accelerator, leveler) come from outside - not from the anode.
- Consumption at the cathode: Additives adsorb to the surface; some are co-deposited or electrochemically reduced/decomposed. This depends on current density and Ah throughput.
- Degradation at the anode: A portion of the organic components is oxidized there (especially in chloride-containing baths or at high anode polarization).
- Side losses: Drag-out on parts/racks, adsorption in the filter/anode bag, thermal/chemical breakdown and purification (e.g., activated-carbon treatment) remove additives from the bath.
Role of the brightener replenisher
- It typically contains the short-lived, highly active components (often the “accelerator/brightener” fraction) that are consumed fastest.
- Without make-up additions, the deposit loses brightness, leveling and fine grain; dull areas, higher stress or roughness may occur.
Conclusion
The anode replenishes the metal, the brightener replenisher replenishes the functional organic additives - both are needed for consistent, bright deposits.
Note on bath life
While, in theory, regenerable electrolytes could run indefinitely via anode dissolution, other additives are consumed. To keep using the expensive electrolyte, those additives are topped up. Still, without special purification, the electrolyte will not last indefinitely - with proper additive maintenance, its service life can be increased many times over.
- How do I build an electroplating cell for depositing metals?
-
An electroplating cell for depositing metals, also known as an electrolytic cell or electroplating cell, is a device used to deposit a layer of metal on another metal through an electrochemical process. Here is a step-by-step guide to building such a cell:
Materials:
- Current source: A controllable DC voltage source.
- Anode: For example, a copper anode if copper is to be deposited, for some solutions a different anode must also be used - follow the instructions for the electrolyte.
- Cathode (workpiece): The piece of metal on which the other metal is to be deposited (e.g. a piece of jewellery).
- Plating solution: A solution containing metal ions of the metal to be deposited (e.g. copper plating solution for copper deposition).
- Tank: To hold the plating solution.
- Lead wires and crocodile clips: To connect the electrodes to the power source.
Set-up:
-
Preparation of the electrolyte solution:
- Fill the container with the electrolyte solution. For the deposition of copper, for example, you can use a copper plating solution.
- Fill the container with the electrolyte solution. For the deposition of copper, for example, you can use a copper plating solution.
-
Inserting the electrodes:
-
-
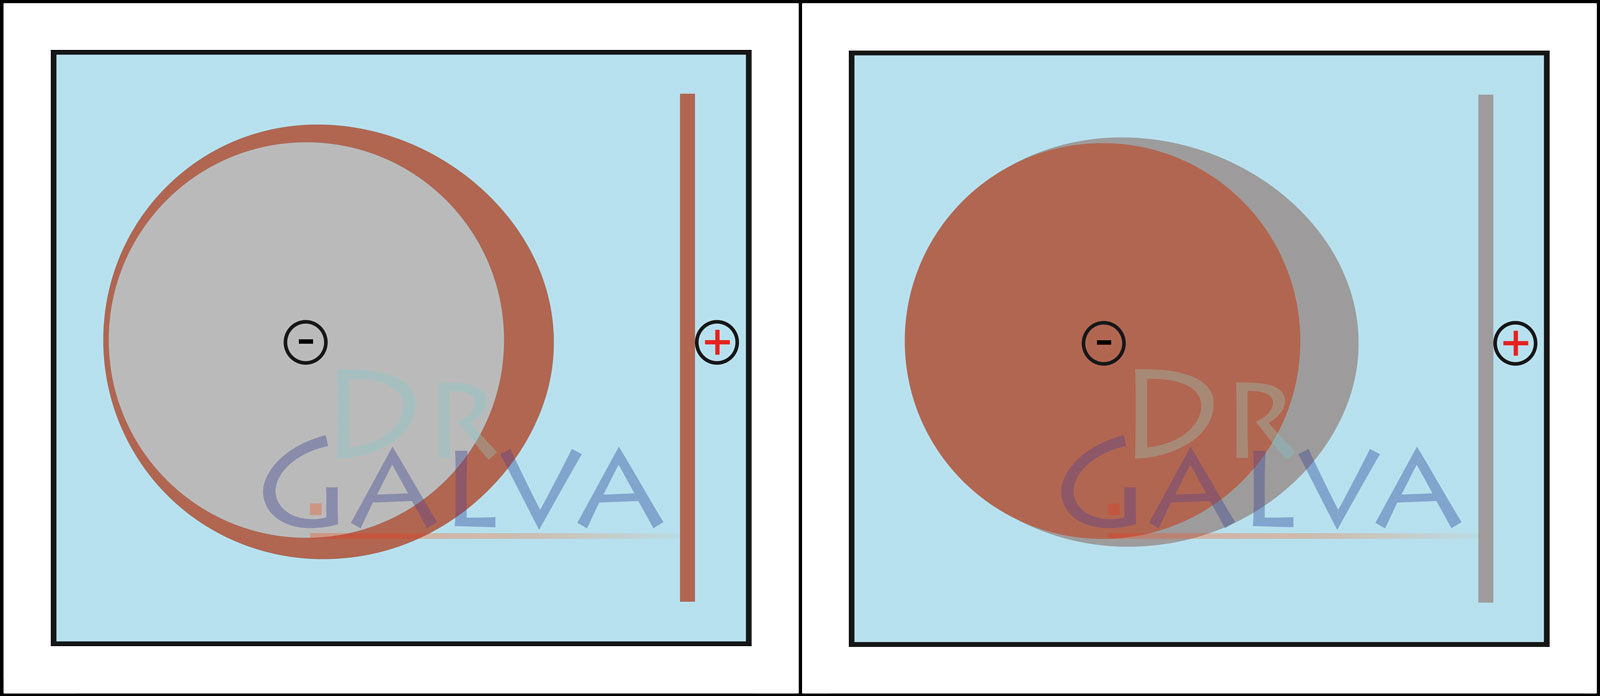
Anode: Insert the anodes (e.g. the copper plate) into the solution. These electrodes will provide the metal to be deposited. Two opposite anodes should be used in order to achieve a more even deposition. Refer to the diagrams. (If it is not possible to achieve such an anode arrangement, an even coating of the workpiece can be achieved by continuous rotation).
Please also refer to the section "Scattering in the galvanising process"
-
Cathode: Place the cathode (e.g. the piece of jewellery) in the solution as well. This is the workpiece on which the metal is deposited.
-
Anode: Insert the anodes (e.g. the copper plate) into the solution. These electrodes will provide the metal to be deposited. Two opposite anodes should be used in order to achieve a more even deposition. Refer to the diagrams. (If it is not possible to achieve such an anode arrangement, an even coating of the workpiece can be achieved by continuous rotation).
-
Connection to the power source:
- Connect the anode (copper plate) to the positive pole of the power source.
- Connect the cathode (workpiece) to the negative pole of the power source. This causes the cathode to become negatively charged, which leads to the metal being deposited on it.
-
Switch on the current flow:
- Switch on the current source. The metal ions in the solution (e.g. Cu²⁺ ions) are attracted to the cathode as it is negatively charged. The ions are reduced to neutral metal atoms and are deposited on the surface of the cathode.
How it works:
- Anode (copper plate): The anode partially dissolves due to the current flow, releasing copper ions (Cu²⁺) into the solution, thus the concentration of copper ions in the electrolyte solution remains constant:
Cu → Cu²⁺ + 2e⁻
- Cathode (workpiece): At the cathode, the copper ions (Cu²⁺) from the solution are reduced by the electrons and deposited on the workpiece as metallic copper:
Cu²⁺ + 2e⁻ → Cu
Important notes:
- Amperage and time: The amperage and the duration of the process determine the thickness of the deposited metal layer. Higher currents and longer times lead to thicker layers.
- Temperature: The temperature of the electrolyte solution can influence the deposition rate. Higher temperatures can accelerate the process, but also influence the quality of the layer.
- Purity of the electrolyte solution: Impurities in the solution can affect the quality of the deposited metal layer.
Result:
A uniform metal layer is deposited on the workpiece using this setup. This is the basic principle of electroplating, which is used in many industrial processes to coat metals and protect or refine surfaces.
General structure:

Comparison of the deposition:
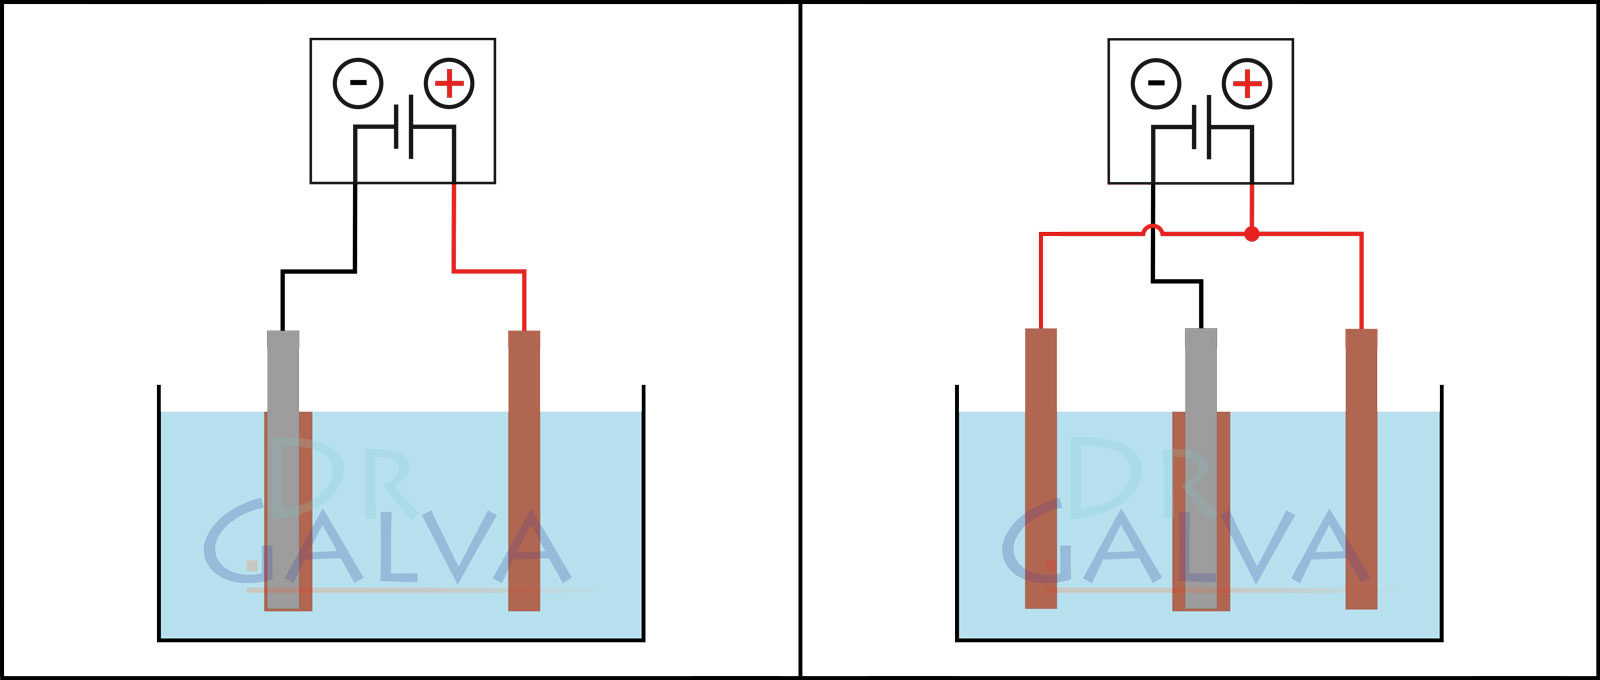
The anode and the workpiece are positioned opposite each other. More metal is deposited on the front side of the workpiece than on the rear side. The workpiece should be rotated at regular intervals. Two anodes and the workpiece are located in the tank. It should be noted that both anodes should be connected to the same power supply unit. The workpiece is placed in the centre between the two anodes. This ensures a more even deposition. - Proper degreasing of surfaces to be coated
-
The correct degreasing of surfaces to be coated is a crucial step in the electroplating process. Thorough cleaning is necessary to ensure proper adhesion of the metal coating and to guarantee the quality of the end products. Here are the key steps and methods for effective degreasing:
Why is degreasing important?
- Adhesion: Grease and oil residues can significantly impair the adhesion of the electroplated coating.
- Coating quality: Contamination leads to uneven coatings, blistering and other defects.
- Corrosion protection: Clean surfaces ensure better corrosion resistance of the coated materials.
Degreasing methods
1. chemical degreasing
- Solvent cleaning: Use of organic solvents such as acetone or isopropanol, which effectively dissolve fats and oils.
- Acetone is characterized by its excellent grease solubility and low boiling point. It is mainly used at the institute for cleaning and degreasing tools. Acetone dissolves fingerprints and other light grease well, but is less effective against machine oil. In fact, acetone can be counterproductive on oil-contaminated workpieces, as it can cause dirt particles to adhere permanently to the surface due to adhesive forces.
- Isopropanol (propan-2-ol) can be used in various disciplines and is particularly versatile. It is used, for example, to clean screens or to remove annoying stickers that otherwise leave unpleasant adhesive residue. Isopropanol is particularly suitable for stubborn tasks where other agents fail, as it completely removes residues. Isopropanol leaves no traces as it evaporates without leaving any residue and is chemically neutral to most materials. It can be diluted with distilled water and is well suited for removing oils and greases as well as for cleaning many surfaces.
- Alkaline degreasing: Use of alkaline cleaners that emulsify and remove fats and oils in aqueous solution.
- Acid baths: Acidic cleaning agents are used in some cases, especially when metal oxides or rust need to be removed.
2. mechanical degreasing
- Brushing and grinding: Use of brushes or abrasives to remove coarse contaminants.
- Blasting: Use of abrasives such as glass beads or sand to thoroughly clean the surface.
3. electrolytic degreasing
- Anodic degreasing: The workpieces are suspended as an anode in an alkaline solution and energized, removing grease and oil by gas generation.
- Cathodic degreasing: The workpieces are used as a cathode, which often allows for gentler cleaning.
Steps for degreasing
1. preparation
- Remove coarse dirt and visible impurities by rinsing or mechanical cleaning.
2. chemical or mechanical degreasing
- Application of the selected degreasing method according to the specific requirements of the material and the contamination. For oil-contaminated workpieces, alternative solvents or degreasing methods that are more effective than acetone should be selected.
3. rinsing
- Thoroughly rinse the parts with distilled or deionized water to remove all residues of the degreaser.
4. drying
- Carefully dry the surface to avoid water stains or re-contamination.
Tips for optimum results
- Temperature control: Many degreasing processes are more effective at higher temperatures.
- Controlled environment: Working in a clean environment prevents re-contamination.
- Quality control: Regularly check the surface cleanliness, for example by means of a water drop test or contact angle measurement.
By following these steps and methods, you ensure that the surfaces to be coated are optimally prepared, resulting in a high-quality and long-lasting electroplated coating.
- How are galvanic electrolytes used?
-
The electrolytes are used undiluted, as they are ready-to-use solutions. The respective parameters of the electrolyte are indicated on the bottle, as well as the required anode. The voltage values may vary, as Ohm's law applies to the solutions. The resistance is crucial here and, depending on the distance, the current flow may increase or decrease. It becomes even more precise when working with the current density.
The electrolytes are also enriched by the dissolution of the metal anode, which increases the range (except for insoluble anodes or foreign metal anodes).
It should also be borne in mind that the current takes the shortest route.
- How much can be coated with a galvanic electrolyte?
-
The amount of material that can be deposited with a galvanic electrolyte depends on several factors:
Key Factors
- Current strength and coating time: According to Faraday's law, the amount of deposited metal is directly proportional to the charge amount (current × time).
- Electrolyte composition: The metal ion content in the electrolyte determines how long it can be used before replenishment or regeneration is needed.
- Process efficiency: Deposition rates vary depending on the metal and electrolyte (e.g., copper and nickel have higher efficiency than chromium).
- Layer thickness: The thicker the layer, the more material is consumed.
Example
One liter of copper electrolyte with 100 g/l copper can theoretically coat:
- 0.1 m² with a layer thickness of 100 µm or
- 1 m² with a layer thickness of 10 µm.
Important Note
The actual coating area is often significantly larger when using the right anodes. With soluble anodes (e.g., nickel or copper anodes), the deposited metal is continuously replenished, allowing the electrolyte to regenerate itself during the process and be used for a much longer period.
- Can the electrolytes be reused?
-
The electrolytes can be used several times. Make sure that no impurities are introduced due to contamination or incorrect anodes. It can also happen that the workpiece dissolves in the electrolyte if an unsuitable choice is made (e.g. galvanised steel in a strongly acidic electrolyte).
- Can anodes be used multiple times?
-
Yes, anodes in electroplating can be used multiple times. Reusing anodes is economically sensible as long as they can effectively supply metal ions. Here are some general guidelines:
-
Material of the Anode: Anodes are often made from the same material as the one being deposited (e.g., nickel, copper, zinc). These anodes are consumed during the electroplating process as they release metal ions into the bath, which then deposit onto the workpiece (cathode).
-
Wear of the Anode: Over time, anodes partially dissolve in the electrolyte because they are the source of metal ions for the coating process. The rate of wear depends on the current density, the duration of the electroplating process, and the type of electrolyte used.
-
Care and Maintenance: Anodes should be regularly inspected and cleaned if necessary to remove oxide layers or deposits that could impair efficiency. Proper maintenance can extend the life of the anodes.
-
Type of Electroplating Process: Some processes require more frequent renewal of anodes than others. For example, anodes in nickel plating are consumed more slowly than in processes with higher current densities or specific chemical requirements.
- Replacing Anodes: If anodes are excessively worn or their performance declines, they need to be replaced to ensure a consistent and high-quality coating.
Overall, anodes in electroplating can be used multiple times as long as they are in good condition and work efficiently. Regular inspection and maintenance are essential to maximize the lifespan of the anodes.
-
Material of the Anode: Anodes are often made from the same material as the one being deposited (e.g., nickel, copper, zinc). These anodes are consumed during the electroplating process as they release metal ions into the bath, which then deposit onto the workpiece (cathode).
- Are other metals possible as anodes?
-
In electroplating, it is crucial that only anodes suitable for the respective process are used. Other anode materials are not permitted as they can dissolve in the electrolyte and contaminate it. This contamination leads to an inferior coating and can significantly impair the entire electroplating process. It is therefore important to use the specified anodes to ensure the quality and purity of the galvanised coating.
- Is it possible to coat small items with a large power supply unit?
-
Yes, you can coat small objects with a large power supply, but it is important to carefully regulate the current. A high-powered supply can deliver more current than is required for small objects, which can result in overcoating, uneven layers, or even damage to the workpiece.
It is recommended to adjust the current to the required current density (current per area) for the specific material and solution to achieve a controlled and even coating. A good power supply should offer the option to fine-tune voltage and current so that even small objects can be coated safely and accurately.
- Can I use a battery instead of an adjustable power supply unit?
-
Using a battery for electroplating - Why we advise against it
Whilst it is theoretically possible to use a battery instead of an adjustable power supply for electroplating, we strongly advise against it. The reason for this is the inability to precisely regulate the voltage and current, which is essential for successful electroplating.
Reasons why a battery is unsuitable:
- No voltage control: batteries supply a fixed voltage (e.g. 1.5V for an AA battery or 12V for a car battery). As electroplating often requires the voltage to be adjusted to control the quality of the plating, the fixed voltage of a battery often leads to sub-optimal results. This can lead to uneven layers, uncontrolled gas development (such as blistering) and other undesirable effects.
- Uncontrolled current: The current depends on the voltage of the battery and the resistance of the electrolytic bath. Without the ability to precisely regulate the current, the current flow may be too high, which can damage the coating, or too low, which makes the process inefficient.
- Decreasing power: Over the course of use, the power of the battery decreases, resulting in a decreasing voltage. This directly affects the quality and uniformity of the coating and can make the process unpredictable.
- Risk of incorrect coating: Due to the lack of controllability, the risk of incorrect coatings or even damage to the workpiece is significantly increased. This can lead to unnecessary material loss and additional costs.
Conclusion:
For high-quality and consistent electroplating results, it is crucial to be able to precisely control the voltage and current. A battery that does not offer any control options cannot fulfil these requirements and often leads to unsatisfactory results. We therefore recommend the use of a controllable power supply that has been specially developed for the requirements of electroplating in order to achieve optimum results.
- Can different electrolytes be mixed?
-
Electrolytes should not be mixed as they are chemically and electrochemically incompatible. In particular, alkaline and acidic electrolytes must not be combined – their different pH levels can lead to unwanted reactions, such as precipitation of metals or other substances. This renders the electrolyte unusable and can result in defective or uneven coatings.
Mixing different metal electrolytes is also not possible. For example, copper and zinc electrolytes cannot simply be combined to deposit brass. The metal ions behave differently in the solution, preventing the formation of a uniform alloy.
Additionally, the additives in electrolytes are precisely formulated for specific pH levels and electrolyte types. Mixing them disrupts their effectiveness, causing the electrolyte to lose its intended properties.
- How can you recognise that the electrolyte is used up?
-
Depletion is often indicated by slower deposition or a change in the color of the deposited metal layer. The original color of the electrolyte may also fade, or the brightness of the coating may diminish.
To keep the metal content constant, a suitable metal anode should always be used. This slowly dissolves during the process and enriches the electrolyte with the required metal ions. Over time, however, contamination occurs (foreign ions, organic residues, polymerization), and brighteners (if present) are consumed.
For this purpose, we offer brightener additives that specifically replenish the missing brighteners and other additives.
For electrolytes with insoluble anodes (e.g. gold), there is no automatic replenishment of metal.
Chromium electrolyte can also only be regenerated with great effort. However, since chromium is usually applied only as a thin top layer on nickel, this plays a minor role.
- Disposal of the solutions
-
The used solutions can be disposed of at a pollutant collection point. Small quantities can usually be diluted and disposed of with the waste water.
However, be sure to find out about your regional conditions.
- Where can I find the safety data sheet?
-
You can find this on the article page in the "Documents" tab, where you can download/open it directly.
- Can plastics be galvanically coated?
-
Yes, plastic parts can be electroplated. Originally, the surface of plastics was etched with chromic acid and then activated with palladium. However, as these substances are highly toxic and harmful to the environment, a more eco-friendly method is increasingly being used: a conductive lacquer. The conductive lacquer makes the plastic electrically conductive without relying on harmful chemicals. This process is therefore significantly safer and more sustainable.
Process of Electroplating Plastics with Conductive Lacquer:
- Surface Preparation: The plastic is thoroughly cleaned to remove grease, dust, and other contaminants that could affect adhesion.
- Application of Conductive Lacquer: A special conductive lacquer containing metal particles (e.g., copper or silver particles) is evenly applied to the plastic surface. This lacquer ensures that the surface becomes electrically conductive, forming the basis for the electroplating process.
- Initial Coating (e.g., Acidic Copper): The surface treated with conductive lacquer is then electroplated with a thin layer of acidic copper to establish a stable, continuous conductivity.
- Electroplating: The plastic can now be coated with the desired metal layer (e.g., nickel, followed by chrome or gold). The thickness of the layer and choice of metal are adjusted based on specific aesthetic and functional requirements.
Advantages of the Process with Conductive Lacquer:
- More Environmentally Friendly: By avoiding chromic acid and palladium, this method significantly reduces environmental impact and health risks.
- Flexible Application: The conductive lacquer can be applied to various types of plastic, allowing for an even coating.
- Efficient: The direct transition from conductive lacquer to electroplating enables a faster, more cost-effective process.
Application Areas:
- Automotive Industry: Chrome-plated plastic parts, such as trim and emblems, manufactured without harmful chemicals.
- Consumer Goods and Electronics: Enhancing and functionalizing plastic housings and decorative elements.
Using conductive lacquers as an alternative to chromic acid and palladium is a sustainable, forward-looking solution for many applications in plastic electroplating.
- Electroplating Stainless Steel
-
Stainless steel can be electroplated, but it requires special pre-treatment. The passive oxide layer on stainless steel makes it difficult for metallic coatings to adhere. The most effective method for successful plating is using Nickel-Strike as an activation layer.
Step-by-Step Guide
1. Surface Cleaning
- Remove grease, oil, or contaminants with a suitable cleaner.
- Rinse thoroughly with deionized water.
2. Nickel-Strike as an Adhesion Promoter
- A thin nickel layer is deposited electrolytically.
- This creates an active surface and prevents the coating from peeling off.
- After Nickel-Strike, the workpiece should be transferred immediately to the next electroplating bath without rinsing.
3. Applying the Main Coating
After Nickel-Strike, the desired metal layer can be deposited:
- Nickel for decorative or corrosion-resistant coatings.
- Copper as an intermediate layer for further coatings.
- Chrome for shiny and wear-resistant surfaces (a dense nickel layer is recommended).
- Zinc or zinc-nickel for corrosion protection.
Why is Nickel-Strike Necessary?
- Stainless steel has a passive chromium oxide layer that prevents direct metal deposition.
- Nickel-Strike removes this layer and ensures an adhesive-friendly surface.
- Without Nickel-Strike, the electroplated coating often does not adhere permanently to stainless steel.
- How can aluminum be coated?
-
As soon as uncoated aluminum comes into contact with oxygen, an oxidation process begins. However, this process hinders the coating. Therefore, aluminum workpieces always require pretreatment with an aluminum activator. This removes the oxide layer and, in the same process, creates a zinc layer on the surface of the material. In this way, the activator prevents contact with oxygen and protects against renewed oxidation. To reliably prevent the formation of bubbles under the coating, we offer our customers an aluminum activator with a low viscosity.
However, zinc is not acid-resistant. Therefore, in the next step, you apply a layer of alkaline/basic copper and then a layer of acidic copper plating solution. This creates a stable base for any further layers.
Depending on the aluminum alloy, it may be necessary to etch the surface in the first step before applying the zinc layer with the aluminum activator. The applied zinc layer is etched again and the treatment with the activator is repeated a second time. This is done because the zincate layer becomes relatively rough and the pores close better. Unfortunately, the zincate process can be considered complicated.
The following sequence would therefore be required to chrome or gold plate aluminum:
- Conditioner for etching
- Aluminum activator to create the zincate layer
- Alkaline copper plating solution to obtain an acid-protective copper layer
- Glossy copper plating solution (acidic)
- Nickel plating solution (Free-Nickel), as a diffusion barrier
- Chrome plating solution or gold plating solution as a final layer
- Aluminum activator for electroplating
-
Working principle
Zincate forms a thin, adherent zinc displacement film on aluminum, preventing immediate re-oxidation of Al and rendering the surface conductive/active for subsequent electrolytic layers (e.g., alkaline copper).
Basic principle (chemistry)
In a strongly alkaline solution (NaOH/KOH), the near-surface Al matrix dissolves to aluminate, while elemental zinc deposits from complexed Zn (e.g., Zn(OH)42−) onto the surface → displacement layer.
Standard process chain (electrolytic)
- Degrease (alkaline), rinse thoroughly.
- Alkaline etch (short), rinse.
- Deoxidize/desmut (e.g., nitric-bearing or conditioner), rinse.
- Zincate (typ. 30–90 s; keep short to avoid a brittle film).
- Double zincate for difficult alloys: chemically strip/activate → zincate again. (The first film is often non-adherent and can be wiped off.)
- Brief activation dip (mildly acidic), go wet-to-wet into plating without drying.
-
Electrolytic strike at low current density:
- Cyanide copper strike (classic, very reliable; toxic/environmentally critical) or
- Alkaline copper
- Then the main layers: e.g., bright copper build, decorative nickel/chrome, etc.
Alloy dependencies
- Al-Si cast (high Si), Al-Mg, high-strength Al alloys: almost always double zincate; possibly longer deoxidize step.
- Fresh cast/blasted surfaces: carefully activate pores and silicon islands; adjust etch/deoxidize times.
Typical defects & remedies
- Peeling/blisters: zincate too thick/aged, oxides/soil, long idle/dry times → shorter zincate times, refresh baths, rapid wet-to-wet transfer (≤ 1–2 min).
- Dark gray: zincate depleted, activation insufficient → renew zincate, optimize activation.
- Roughness/edge attack: etch chemistry too aggressive/too long → correct times/recipes.
Bath control (zincate)
- Strongly alkaline, contains Zn complexes; aluminate loading increases over time → activity drops.
- Measures: filtration, partial renewals/make-ups, short contact times, steady temperature/alkalinity.
Safety/Environment
Zincate is corrosive → use PPE (gloves, goggles, apron); avoid splashes. Keep rinses alkaline/clean; treat Zn/Al-bearing effluents properly. Cyanide strikes require strict worker-safety and wastewater controls.
- How can i electroplate 3D printing?
-
Electroplating 3D printed objects is a multi-step process that requires some specialized equipment and materials. Here are the basic steps for electroplating a 3D printed object:
1. preparation of the 3D printed object
- Cleaning: Thoroughly clean the object to remove any dust, oil or other contaminants. This can be done with isopropyl alcohol or another suitable cleaning agent.
- Smoothing: If necessary, smooth the surface of the 3D printed object to ensure an even coating. This can be achieved by sanding or chemical smoothing.
2. apply conductive layer
- Sprayable conductive paint: Apply a conductive paint or ink to the object. This paint often contains copper, silver or graphite to make the surface conductive.
- Conductive coating materials: Alternatively, you can dip the object in a conductive solution or spray it with a conductive coating.
3. preparation for electroplating
- Attach the anode and cathode: Attach the 3D-printed object as the cathode in your electroplating bath. The anode is usually made of the metal you want to apply to the object (e.g. copper, nickel). Observe the data for the solution.
- Electrolytic solution: Make sure you use the correct electrolytic solution for the metal you are plating. Each metal coating requires a specific solution.
4. electroplating process
- Current source: Connect the anode and cathode to a direct current source. The current flow allows the transfer of metal ions from the anode to the object.
- Set parameters: Set the correct parameters (current / voltage) to achieve a uniform coating.
5. post-processing
- Cleaning: Remove the object from the electroplating bath and rinse thoroughly with water to remove all residues of the electrolytic solution.
- Polishing and sealing: Polish the plated surface to achieve the desired shine and seal with a clear coat or other protective coating if necessary.
Materials and equipment
- Conductive paint
- Electroplating bath and electrolytic solution
- Anode suitable for the electrolyte
- Direct current source
- Cleaning agent and polishing tools
Safety instructions
- Protective equipment: Wear suitable protective equipment, including gloves, goggles and respiratory protection to protect yourself.
- Ventilation: Ensure that the work area is well ventilated to minimize fumes from the chemicals used.
Electroplating can significantly improve the mechanical and aesthetic properties of 3D printed objects. If you follow these steps carefully, you can produce high-quality metal-coated 3D printed parts.
- How can chrome be coated?
-
A chrome-plated surface does not provide sufficient adhesion for new coatings. Therefore, the existing chrome layer must be removed. Use a specially developed chrome remover for this process. These remover solutions are particularly safe to use. For example, special additives prevent the formation of highly toxic hexavalent chromium.
There is usually a nickel layer under the old chrome layer. This must be reactivated with a specially developed activator for the new coating. To prevent the reformation of an oxide layer, the workpiece is recoated immediately after the nickel layer has been reactivated.
Alternatively, there is also a Gold-Strike that can be applied directly to chrome. These are based on the fact that the oxide layer is reduced in the process and gold is deposited at the same time.
- Why no chromium anode? And why is an aluminum anode permissible?
-
Trivalent Chromium Electrolytes: Choice of Anodes
In trivalent chromium electrolytes, the chemical and electrochemical conditions differ from those in classic hexavalent chromium baths. Therefore, anodes must be selected so that they do not disturb the bath composition and do not generate substances that are hazardous to health.
Why no chromium anode in trivalent chromium electrolytes?
-
Chromium dissolution behavior
In trivalent chromium baths, chromium is already present in the +III oxidation state, which is relatively stable. However, a chromium anode could lead to uncontrolled oxidation to chromium(VI):-
Chromium(VI) (hexavalent chromium) is highly toxic and carcinogenic. Even small amounts in the bath therefore pose a serious risk to health and the environment.
-
Chromium(VI) (hexavalent chromium) is highly toxic and carcinogenic. Even small amounts in the bath therefore pose a serious risk to health and the environment.
-
Bath stability
Trivalent chromium baths are deliberately formulated to contain as little Cr(VI) as possible, or none at all. A chromium anode would disturb this balance, since Cr(VI) can form during electrochemical oxidation. This impairs deposit quality and entails significant hazards.
-
Practical considerations: Inert or special anodes
- Platinum or iridium anodes are excellent inert anodes, as they are extremely resistant to the electrolyte and release virtually no material. However, they are expensive.
- Graphite anodes are also frequently used, but they can sometimes release fine graphite particles into the bath (erosion/wear). These can settle on the workpiece surface and lead to dark deposits.
Why is an aluminum anode permissible?
-
Protective oxide layer (passivation)
Aluminum forms a dense layer of aluminum oxide (Al₂O₃) on its surface. This layer passivates the metal and significantly reduces the dissolution of aluminum ions into the bath.
-
Minimal disturbance of bath chemistry
Under the usual voltage and pH conditions in trivalent chromium electrolytes, aluminum remains largely passive. Thus, only relatively small amounts of Al³⁺ ions enter the electrolyte, so there is little impact on the bath’s composition or pH value.
-
Aluminum dissolves but does not deposit
Although some aluminum does indeed enter the bath as Al³⁺, it practically does not form a metallic coating in an aqueous solution.- Depositing aluminum from aqueous solutions is thermodynamically very difficult, because water is more easily reduced (hydrogen evolution).
- Therefore, no unwanted aluminum coating appears on the workpieces.
-
Availability and cost
Aluminum is inexpensive, easy to work with, and—provided passivation functions reliably—a practical anode material for trivalent chromium baths.
Conclusion
- A chromium anode in a trivalent chromium bath would lead to the unwanted formation of Cr(VI), which is highly hazardous to health.
- Aluminum anodes are permissible due to their protective oxide layer, which barely contaminates the electrolyte and does not produce toxic by-products.
- Platinum and iridium anodes are considered highly durable inert anodes, but they are expensive.
- Graphite anodes are relatively inexpensive but can release graphite particles through wear, resulting in dark deposits.
-
Chromium dissolution behavior
- Galvanic chrome plating - DIY deluxe: Step by step to a perfect chrome finish!
-
Electroplating is a reliable way to achieve unique chrome finishes. With this DIY guide, we offer a simple step-by-step guide to help you achieve a perfect chrome look . Benefit from our experience and achieve a convincing result!Chrome plating can be applied to metals such as: steel, stainless steel, bronze, iron, brass, copper and zinc die-cast. The chrome surface is applied to a thick undercoating of nickel. It is a long-lasting and robust finish that is less susceptible to wear and scratches.
Introduction to Galvanic Chrome Plating
If you are interested in Galvanic Chrome Plating, then you have come to the right place! Galvanic chrome plating is a process in which a thin layer of chrome is applied to a metal. This process is particularly popular because of its durability and resistance. In addition, the chrome finish looks simply great and gives every workpiece that certain something. But how does galvanic chrome plating actually work? First, the workpiece is immersed in a bath of chrome electrolyte and a current is passed through it. This transfers the chrome from the electrolyte to the workpiece and forms a layer of chrome. However, in order to achieve a perfect result, you should follow some important tips and tricks. For example, thorough cleaning of the workpiece before chromium plating is essential. The choice of the right amperage and the duration of chrome plating also play a decisive role. With this basic information you are well prepared to turn your workpiece into a shining highlight.
The most important tools and materials
To achieve a perfect chrome finish, you need the right tools and materials. Here are the most important things you need: First you need an electroplating system, which consists of a power source, the chrome electrolyte and anode. You will also need a suitable surface to chromium plate. It should be clean and free of rust, dirt and grease. To achieve this, you can use sandpaper, steel wool or a wire brush. You will also need safety goggles, gloves and a breathing mask to protect you from the chemical fumes. With these tools and materials, you are ready to create your own chrome finish.
Preparing the surface for the chrome finish
Before the actual chrome plating begins, it is essential to prepare the surface thoroughly. Only on a clean and smooth surface can the chrome finish adhere perfectly and develop its full effect. First of all, you should thoroughly clean the surface to be chromed and remove dust, dirt and grease. A special cleaner for metal or a mild washing-up liquid is best suited for this. Then you should work on the surface with fine sandpaper or a wire brush to remove unevenness and rust deposits. Be careful not to remove too much material and damage the surface. Finally, you should clean the surface thoroughly and let it dry before you start the actual chrome plating. By carefully preparing the surface, you lay the foundation for a perfect chrome finish and can soon enjoy a shiny result.
Application of galvanic chrome plating
When it comes to chrome plating, electroplating is one of the best options. It is relatively easy to carry out and gives a perfect result. However, applying electroplated chrome plating requires a few important steps to ensure that the chrome finish is even and durable. First, the surface of the object must be thoroughly cleaned to ensure that there are no dirt particles or grease residues that could affect the chrome finish. Then the object must be immersed in a bath of a special chrome solution to create a layer of chrome on the surface. It is important that the object is constantly moved throughout the process to ensure that the layer is applied evenly. Once the layer of chrome has been applied, the object must be thoroughly rinsed and dried to achieve the perfect chrome finish. If you follow these steps carefully, you will be able to give any object a perfect chrome finish and make it look like it came straight from a professional workshop.
Finishing the surface to achieve a perfect finish
After you have successfully completed the chrome plating process, it is important to carefully prepare the surface to achieve a perfect finish. First of all, you need to remove any impurities, such as fingerprints or dust particles, from the surface. You can use a soft cloth or a microfibre cloth for this. Then you should polish the surface with a special cleaning agent for chrome. This not only removes any residues, but also protects the surface from corrosion and oxidation. Finally, you can treat the surface with a wax or sealant to protect it from scratches and damage. With this finish, you can achieve a perfect chrome finish that will last a long time and give your work the final touch.
Tips and tricks for a professional result
In order to achieve a professional result when electroplating, there are a few tips and tricks that you should follow. First of all, it is important that you follow all the steps exactly and do not take any shortcuts. The right equipment is also crucial for a perfect chrome finish. Make sure you use high-quality materials and invest in a good power source. Thorough cleaning of the object to be chrome-plated is also essential to ensure an even coating. You should also ensure that the surface of the object is free from scratches and imperfections. Good preparation and careful work are therefore the be-all and end-all for a professional result when electroplating.
Conclusion: DIY deluxe - with the right know-how to the perfect chrome finish
And voilà, the result is impressive: Your self-chromed workpiece shines in new splendour and is ready for use. With the right know-how and a little patience, chrome plating is no problem, even for hobbyists. It is important that you follow the safety instructions and carry out the individual steps carefully. With the right equipment and a few tricks of the trade, you can give your DIY projects a noble and high-quality finish. So what are you waiting for? Give it a try and give your work the perfect chrome look!
- Alkaline/basic copper plating solution - Areas of application
-
If iron or acid-sensitive materials such as lead, zinc, copper or steel are to be electroplated, the use of "alkaline copper plating solution" is recommended for preparation. For example, zinc would be dissolved in an acidic electrolyte without pretreatment with "alkaline copper plating solution". To prevent this, the material-friendly alkaline electrolyte provides the acid-sensitive materials with an initial copper layer and prepares them for the final coating with "Glossy copper plating solution acidic".
Another positive effect is the excellent adhesion properties of the layer created by "alkaline copper plating solution" and the improved corrosion protection. Dr. Galva's alkaline copper plating solution is characterized by a particularly fine-grained deposition and is ductile.
- What distinguishes an alkaline copper electrolyte from an acidic one?
-
In electroplating, there are two main types of copper electrolytes: alkaline and acidic. They differ in their composition, pH value, and the properties of the deposited copper layers.
Differences between alkaline and acidic copper electrolytes:
pH value:
- Alkaline copper electrolyte: Has a high pH value (basic), often based on salts like copper cyanide or copper sulfate, with complexing agents added for stabilization.
- Acidic copper electrolyte: Has a low pH value (acidic) and is typically based on copper sulfate and sulfuric acid.
Deposition properties:
- Alkaline copper electrolyte: Suitable for coating acid-sensitive materials like zinc or iron. It provides good adhesion to these materials and creates a layer that is often more ductile, meaning it can be deformed better without breaking.
- Acidic copper electrolyte: Suitable for smooth, decorative layers with a glossy surface. It is often used for large, simple metal parts and offers faster deposition and a finer crystal structure.
Use and application:
- Alkaline copper electrolyte: Commonly used for complex-shaped workpieces and for uniform deposition on various substrates, especially when good adhesion and ductility are important. It is often used in electronics, for printed circuits, and for copper plating on iron.
- Acidic copper electrolyte: Ideal for applications requiring a shiny, decorative surface and is frequently used for decorative coatings on metals, such as in the jewelry industry or for chrome-plated surfaces as a base layer.
- I want to copper-plate steel; should I choose acidic or alkaline?
-
For the copper plating of steel parts, the alkaline copper electrolyte should be chosen. When using an acidic copper electrolyte, electroless deposition of copper on the steel can occur. This uncontrolled chemical reaction leads to a coarse-grained copper layer with poor adhesion, which impairs the quality of the coating.
The alkaline electrolyte allows for controlled, electrolytic deposition of copper, resulting in an even and firmly adhering layer. However, alkaline electrolytes unfortunately do not deposit with a shiny finish, so often an additional acidic copper plating with a bright copper electrolyte is performed afterwards to achieve a shiny, decorative surface. Therefore, it is common practice to first use the alkaline copper electrolyte on steel components for good adhesion and then an acidic copper electrolyte for the shiny finish.
- Why is an acidic copper plating solution only partially suitable for iron?
-
Copper can deposit onto iron without current due to the electrochemical potential, as copper is more noble than iron. During this electroless deposition, iron oxidizes in the acidic solution, reducing copper ions and depositing copper onto the iron surface.
However, this electroless deposition results in poor copper adhesion because coarse copper crystals form, weakening the bond between copper and iron.
To mitigate these issues, the workpiece can be introduced into the solution under an electric current, leading to electrolytic copper deposition. The applied current enables controlled deposition, thus improving copper adhesion. This way, the problems of electroless deposition can be largely avoided.
To prevent this issue, a thin layer of alkaline copper electrolyte can be applied.
- What is the procedure for alkaline followed by bright copper plating?
-
1. Preparation of the workpiece
- Degreasing: Chemically or electrolytically, until the surface is completely free of grease.
- Pickling: Conditioner to remove oxides.
- Rinsing: Rinse thoroughly with deionized or tap water to prevent acid residues from being carried into the copper bath.
2. Deposition in alkaline copper bath
- Purpose: Thin adhesion layer on the base material.
- Conditions:
Layer thickness only 1-3 µm (not thicker, otherwise risk of peeling increases). - Maintain uniform current density, better to start slightly lower.
- Conditions:
- Rinsing: Rinse thoroughly immediately after the process.
3. Deposition in acid bright copper bath
- Transition: Transfer the workpiece to the bright copper bath after rinsing.
- Current supply:
- Start with low current density so that the layer adheres finely and firmly.
- Then slowly increase to normal working current density.
- Layer thickness: Can be built up as needed, decorative or functional.
Errors:
Too thick alkaline copper layer: The purpose is only to form a thin, adhesive barrier layer. A too thick layer can create stress and later flake off.
Incorrect bath parameters: Current density or voltage too high at the start in bright copper - the not yet perfectly conductive surface develops „burns“ or a disturbed crystal structure that peels off.
- What does Nickel-Strike do?
-
Nickel-Strike is a very thin, highly acidic nickel bonding interlayer. It activates passive or difficult-to-coat surfaces, ensuring significantly better adhesion of subsequent layers.
What is it used for?
- Stainless steel (V2A/V4A, high-alloy steels): removes/passivates the chromium oxide layer and makes the surface “active”.
- Already nickel-plated parts / old nickel: reactivates old or tarnished nickel surfaces.
- After dechroming: activates the underlying nickel for further plating.
Not suitable / better: Aluminium → aluminium activator (zincate); zinc/zamak → first alkaline copper; mild steel → conditioner usually sufficient.
How does it work?
- Strongly acidic, chloride-containing nickel electrolyte is run briefly at relatively high current density.
- Etches oxides and produces a very thin, rough nickel seed layer (typically tenths of µm).
- This seed layer provides excellent adhesion for main nickel, optionally copper – and thus also for chrome (chrome only on nickel).
Practical tips
- Sequence: thoroughly degrease → rinse → nickel strike → immediately wet-on-wet into main nickel.
- Keep short: prolonged strike can make the layer brittle / promote undercutting.
- Bath maintenance: keep solution clean/fresh; too low current density = insufficient activation.
Reminder: Chrome only on nickel – nickel strike makes difficult surfaces “nickel-ready”.
- How do you coat tarnished nickel?
-
Nickel that has been in contact with oxygen for a long time will form oxides. You can remove these oxides with our Nickel-Strike and at the same time build up a sustainable nickel layer. Then you can apply the desired coating.
Pre-treatment with Nickel-Strike is not necessary if the nickel layer was applied immediately before the subsequent coating. A new nickel layer should be coated within an hour, as the oxide layer builds up slowly.
- What does Free-Nickel mean? Is it nickel-free?
-
No, the Free-Nickel nickel plating solution is not nickel-free. The name ‘Free-Nickel’ refers to the fact that this nickel plating solution is allowed to be sold freely because it meets the legal requirements for sale to private individuals. Many conventional nickel plating solutions are subject to strict restrictions in the EU and are not allowed to be sold by mail order.
Our Free-Nickel nickel electroplating solution, on the other hand, has been specially developed to meet these requirements and can therefore be purchased online without restrictions. Please note that it is still a nickel plating solution that deposits nickel and therefore contains nickel.
- How to electroplating nickel: Simple DIY Tutorial
-
Electroplated nickel plating is a simple and inexpensive way to protect metal parts quickly and efficiently. In our DIY tutorial you will learn everything you need to know to nickel plate your metal parts yourself. Learn how to protect and lend your projects quickly and effectively! Nothing beats the satisfaction of successfully completing your own project. So, what are you waiting for? Let's go!
Why electroplating?
If you're wondering why electro-nickel plating is a good option, there are a few reasons. Firstly, the process offers high corrosion resistance, which means that the nickel-plated object will last longer and be less susceptible to rust and similar damage. In addition, the process gives the object a shiny and uniform surface that is not only aesthetically pleasing, but also offers better conductivity. Electro-nickel plating can also help make the object more resistant to wear and abrasion, which is particularly useful if it is going to be subjected to regular wear and tear. Overall, electroless nickel plating offers a variety of benefits that make it an attractive option for those looking to protect and enhance their objects.
What is electroplating and how does it work?
Electroplating is a process in which a layer of metal is applied to another material. It is a common method of protecting metal parts or giving them a decorative appearance. The process of electroplating is done by electrolysis, where an electric current is passed through a solution containing the metal to be applied to the material to be plated. The material to be plated is called the cathode, while the metal to be applied is called the anode. When the current flows through the solution, metal ions are released from the anode and deposited onto the cathode, creating a permanent metal layer. The thickness of the layer depends on the duration of the process. Electroplating can be used on a variety of materials including steel, copper, brass and aluminium. It is a cheap and easy way to protect metal parts or give them a decorative look.
What tools do I need for a DIY project?
If you want to do a DIY project, it is important to have the right tools at hand. For electroplating you will need some special tools that will help you to complete the project successfully. First of all, you will need a power source such as a battery or a power supply. You will also need an electrolyte to deposit the nickel onto the metal. A nickel anode and a cathode material are also necessary. You will also need a suitable cleaning agent to clean the metal before nickel plating. A sandpaper or wire brush can also be helpful to prepare the metal. Don't forget to wear protective gloves and goggles to protect yourself from injury. With these tools and a little practice, you can successfully nickel plate your DIY project.
Step-by-step guide to electro nickel plating
To electroplating you will need some special materials and tools. First, you need to thoroughly clean and degrease the parts to be nickel-plated to ensure that the nickel coating adheres well. Then you need to prepare a nickel bath solution and place it in a suitable container. Next you need to connect a power source and immerse the parts to be nickel-plated in the solution as a cathode. The anode rod should be immersed in the solution but not come into contact with the parts to be nickel-plated. During the process you must monitor the current and time to ensure that the desired thickness of nickel plating is achieved. When the process is complete, the parts must be thoroughly rinsed and dried. It is important to follow all safety precautions and wear appropriate protective equipment to avoid injury. With these step-by-step instructions, you can now successfully make your own electro-nickel plated parts.
Tips and tricks to achieve the best possible result
To get the best possible result from electroplating, there are a few tips and tricks you should follow. First of all, it is important that you have all the necessary materials and tools ready before you start the process. Careful preparation is the key to success. You should also make sure that the surface to be nickel-plated is thoroughly cleaned and degreased to ensure optimal adhesion of the nickel coating. An even current supply and an appropriate duration of the electroplating bath are also crucial for a perfect result. If you follow these tips and tricks, you are sure to get a great result and take your DIY projects to a new level.
Application of galvanic nickel plating
If you're wondering what electroless nickel plating is used for, you've come to the right place. Electroplated nickel plating is a method of coating metal objects with a thin layer of nickel. This layer protects the metal from corrosion and gives it a shiny surface. Electroplated nickel plating is used in many areas, such as the electronics industry, the automotive industry and jewellery manufacturing. It is an inexpensive method to refine metal objects and protect them from external influences. With our DIY tutorial, you can easily do galvanic nickel plating at home and finish your own metal objects.
Important things to keep in mind when electroplating
If you have decided to electro nickel plating, there are a few important things to keep in mind to get the best results. First of all, it is important that the object to be nickel plated is clean and free from oil, grease and other contaminants. Thorough cleaning with a suitable cleaning agent is therefore essential. You should also make sure that the current intensity and the duration of the electroplating process are adapted to the material and size of the object to be nickel-plated. Too high a current or too long a plating time can lead to undesirable results. Finally, you should also make sure that you follow all the necessary safety precautions to avoid injury or damage. However, with these important tips and a little practice, you can successfully electroplate nickel and give your objects a long-lasting and attractive nickel coating.
What are the advantages and disadvantages of electroplating?
If you decide to electroplating nickel, there are some advantages and disadvantages that you should consider. The biggest advantage is the protective function that nickel plating offers. Electroplating protects the base metal from corrosion and wear. In addition, nickel plating can improve the appearance of the object and give it a shiny look. However, there are also some disadvantages. For one thing, nickel plating can be expensive, especially if it is done by a professional. For another, it can be difficult to apply an even layer, which can lead to uneven results. Furthermore, nickel plating can cause allergic reactions if the object comes into contact with the skin. Nevertheless, electroplated nickel plating is a popular way to protect and beautify metal objects.
What can be the cost of a DIY project?
If you decide to electroplating nickel, you should be aware that there may be some costs involved. Firstly, you will need a suitable power source, such as a power supply that can be set to the required voltage and current. You will also need a nickel electrolyte solution, which will vary in cost depending on the size of the object to be nickel-plated. Accessories such as anodes, cathodes and connecting cables must also be taken into account. You will also need suitable protective clothing to protect yourself from the chemicals. If you buy all the equipment yourself, it can quickly become expensive. However, there is also the possibility of renting the equipment or hiring it from a DIY shop. It is important to consider in advance whether the cost of the DIY project is worth it and whether you will use the equipment in the future.
Conclusion: Electroplating as an efficient way to protect metal surfaces
When it comes to protecting metal, electroplating is an extremely efficient method. By applying a thin layer of nickel to the metal surface, it is protected from corrosion and abrasion. Nickel plating also gives the metal a shiny and attractive appearance. The best part is that you can easily do nickel plating yourself. With a few basic tools and materials, you can nickel plate your own metal parts to make them last longer and look better. Whether you're a hobbyist or a professional craftsman, nickel plating is definitely a skill worth learning.
- Can nickel be deposited directly onto brass?
-
Yes. Nickel can be electrodeposited directly onto brass. For a safe start, use a short nickel strike (acid, chloride-rich) as an interlayer; then build with nickel.
Recommended process sequence
- Degrease, rinse thoroughly.
- Micro-etch for Cu/Zn alloys (very short), rinse.
- Acid activation (conditioner), proceed wet-to-wet.
- Nickel strike, start at low current density, 20–90 s.
- then nickel.
Notes
- Avoid dezincification: keep etch/activation times short; no drying steps.
- Start parameters: begin with low current density, ramp quickly to setpoint; a moderate chloride level promotes adhesion.
- Against yellowish show-through: provide sufficient total Ni thickness.
Typical defects & remedies
- Blisters/peeling: etch too long, dirty surface, start current too high → shorten times, re-activate, start at low current density.
- Dark-gray start/passivation: avoid waits, renew activation.
- Roughness: improve filtration/rinse quality, eliminate particle sources.
- Is passivation necessary after zinc plating?
-
Whether post-galvanizing passivation is necessary depends on the intended use and specific requirements.
Not always strictly required
For many standard applications, a simple zinc layer (e.g., achieved through hot-dip galvanizing or electroplating) is sufficient to provide basic corrosion protection. In particular, if the components are not subject to stringent aesthetic or corrosive demands, passivation is often omitted.
Advantages of passivation
- Additional corrosion protection: Passivation processes (e.g., chromating in various colors, phosphating, etc.) create an extra protective layer that shields the underlying zinc from oxidation and extends the service life of the part.
- Enhanced appearance: Depending on the method (blue, yellow, black, etc.), passivated surfaces can offer a more appealing look.
- Reduced risk of white rust: Freshly galvanized surfaces are prone to “white rust” when exposed to moisture or condensation. A passivation step lowers this risk.
Special requirements
In cases where components face extreme environmental conditions (e.g., salt spray, high humidity, aggressive chemicals) or need a defined appearance (such as in the automotive industry or for decorative purposes), passivation or chromating is commonly recommended—or even mandated.
Conclusion
A post-galvanizing passivation is not always mandatory, yet it offers clear benefits in terms of corrosion protection and visual appeal. Whether it is required ultimately depends on the operating conditions and quality demands for the specific part.
- Yellow chromating - yellow zincing
-
Yellow chromating (colloquially referred to as “yellow zinc coating”) is a galvanic technique in which already galvanized surfaces are further refined through a yellow passivation. The result is a characteristic yellowish to golden surface that is both aesthetic and corrosion-inhibiting.
How Does Yellow Chromating Work?
-
Zinc Layer as the Basis
First, the metal (e.g., steel) is galvanized (via electroplating or hot-dip galvanizing). This zinc layer serves as the foundation for the chromating process.
-
Chemical Post-Treatment
This is followed by a passivation or chromating step. In the yellow variant, a special chromate solution produces the typical yellow to golden hue during the process.- In the past, chromium(VI) was often used, which is now widely regulated.
- Modern systems increasingly rely on chromium(III) in order to meet environmental and health regulations.
-
Color Development
The zinc surface reacts with ingredients in the chromate solution, forming a conversion layer (“chromate layer”). This layer enhances corrosion protection and creates the characteristic yellow-golden finish.
Why Use Yellow Chromating?
- Visual Upgrade: The yellow/golden surface is decorative and highly sought after in many sectors, for example for fittings, screws, or decorative parts.
- Additional Corrosion Protection: The chromate layer provides further protection against oxidation of the underlying zinc.
- Proven Standard: Yellow-chromated parts have been regarded as a benchmark for corrosion-resistant, aesthetically appealing surfaces for decades.
Chrom(VI)-Free vs. Chrom(VI)-Containing
- Chrom(VI)-Containing: Older, widespread methods that yield an intensely yellow color, but are heavily regulated or prohibited due to their harmful effects on health and the environment.
- Chrom(III)-Based: Much more environmentally and health friendly; the color intensity may be somewhat less pronounced, but these processes comply with current regulations and are continually being refined.
Advantages and Limitations of Yellow Chromating
Advantages
- Striking yellow/golden appearance
- Additional corrosion protection compared to plain zinc surfaces
- Versatile use, e.g., in the automotive industry, electronics, or home applications
Limitations
- Environmental constraints on chromium(VI)-based processes
- Limited to yellow/gold tones
- Quality highly dependent on pretreatment and the condition of the zinc layer
Conclusion
Yellow chromating is a post-treatment for galvanized surfaces, producing a yellow or golden chromate layer. This layer enhances corrosion protection while giving the workpiece a distinctive yellow/golden look. Previously carried out mainly with chromium(VI)-containing solutions, more and more chromium(III)-based systems are now in use in order to comply with environmental and health regulations. Despite certain differences in color intensity or processing parameters, yellow-chromated surfaces remain among the most popular and widely used finishes in galvanizing technology.
-
Zinc Layer as the Basis
- Black Chromating – Black Zinc Coating
-
Black chromating (colloquially also referred to as “black zinc coating”) is a process in electroplating technology where an already galvanized surface is further treated with a special dark passivation. This chemical post-treatment creates a deep black or anthracite-colored chromate layer, which enhances corrosion protection and gives the surface a distinctive dark appearance.
How Does Black Chromating Work?
-
Zinc Layer as a Basis
At the beginning, the metal (e.g., steel) is galvanized (either electroplated or hot-dip galvanized), so that a zinc layer is present as a basic protective coating.
-
Dark Passivation
After galvanizing, the passivation/chromating process is carried out using a special solution, which, due to its composition, results in a black coloration. Traditionally, chromate solutions containing chromium(VI) were used for this purpose, but these are now heavily regulated due to health and environmental laws. Modern chromium(III)-based or other chromium(VI)-free processes have since become standard and provide a very dark finish.
-
Reaction and Layer Formation
In the passivation solution, the existing zinc layer reacts with certain chemicals, forming a conversion layer (chromate layer). This layer is black in color and provides additional protection against corrosion.
Advantages and Applications
- Distinctive Appearance: The black surface is popular for design or camouflage reasons (e.g., military applications).
- Enhanced Corrosion Protection: The chromate layer shields the underlying zinc from oxidation, thereby extending its lifespan.
- Versatile Applications: Black-chromated components are used in the automotive industry, for screws and fasteners, in electronics, for DIY applications, and for decorative purposes.
Chromium(VI)-Based vs. Chromium(VI)-Free Systems
- Chromium(VI)-Containing Processes: Provided an intensely black coloration, but are heavily restricted or banned due to environmental and health concerns (e.g., REACH regulation).
- Chromium(VI)-Free/Chromium(III)-Based Systems: Offer a dark coloration, are more environmentally and health friendly, and are continuously developed to match earlier methods in terms of color intensity and corrosion protection.
Limitations of Black Chromating
- Susceptibility to Wear: Mechanical stress (e.g., friction, scratches) can wear down the dark chromate layer.
- Precision in Process Control: To ensure a uniformly black result, baths and process parameters (temperature, time, chemicals) must be precisely controlled.
- Dependence on Zinc Quality: A well-prepared zinc layer is essential because the black tint will only adhere properly if the zinc is clean and evenly applied.
Conclusion
Black chromating, often also called “black zinc coating,” is a method of dark passivation for galvanized surfaces. The result is a deep black or dark appearance along with an additional boost in corrosion protection. In chromium(VI)-free variants, black chromating today represents a more environmentally and health-friendly way of achieving an appealing, black surface.
-
Zinc Layer as a Basis
- Electroplating zinc yourself: A guide to an easy DIY project!
-
Attention DIY lovers: Galvanising yourself is easier than you think! With our instructions, you'll get a detailed overview of the basics of galvanising and the benefits it brings. Let's get started on an exciting DIY project!
Introduction
Hey there! Want to learn how to electro-galvanise your own metal parts? Then you've come to the right place! In this guide, we'll show you step by step how to do your DIY project. But before we get started, we'd like to explain what electro-galvanising actually means. It is a process in which a protective layer is applied to the metal to protect it from corrosion. This protective layer is made of zinc and is applied to the metal through a chemical reaction. Now you know what to expect - let's get started!
What is galvanising with zinc?
Galvanising is a process in which a layer of zinc is applied to a metal to protect it from corrosion. It is one of the most commonly used methods of protecting steel and iron against rust. The process works by electrolysis, where the metal is immersed in a zinc solution and an electric charge is passed through the metal. This causes the zinc from the solution to be applied to the metal, creating a protective coating. Galvanising is an inexpensive and effective way to protect metals from corrosion and is also suitable for DIY projects. With some basic knowledge and tools, you can do your own galvanising projects at home.
Make preparations
Before you start galvanising, you should make some preparations to ensure a successful DIY project. Firstly, make sure you have all the necessary materials and tools to hand, such as a zinc anode, a galvanising bath, a power source and protective gloves. It is also important that you set up a suitable workplace that is well ventilated and has no flammable materials nearby. Before you start the galvanising process, you must ensure that the object to be galvanised is thoroughly cleaned and degreased to ensure optimal adhesion of the zinc coating. Remember that safety is paramount and you should always wear protective gloves and goggles to avoid injury. With these preparations, you are ready to successfully complete your DIY galvanising project.
Get tools and materials for galvanising
To successfully complete your DIY galvanising project, you will need the right tools and materials. First, you should choose a suitable galvanising solution, which you can purchase from us. A suitable container in which you can mix the galvanising bath and immerse the object to be galvanised is also very important. For example, a plastic container or an old stainless steel pot is suitable. Another important tool is a rectifier, which regulates the current strength and thus enables an even galvanising result. You also need an anode, which is made of zinc and is hung in the galvanising bath. This serves as a current source and ensures that the zinc is deposited on the object to be galvanised. To clean the object thoroughly before galvanising, it is advisable to use sandpaper and cleaning agents such as isopropanol. With these tools and materials, you are well equipped to successfully complete your DIY galvanising project.
Prepare and grease the surface
Before you can start the actual galvanising process, you need to make sure that the surface of the object to be galvanised is smooth and clean. To do this, you should clean it thoroughly and remove any rust. Then you should lightly roughen the surface with a wire brush or sandpaper to ensure better adhesion of the zinc coating. To achieve the best result, it is also advisable to treat the surface with a suitable grease or oil before galvanising. This prevents the zinc from sticking to unwanted areas and prevents unsightly drops or uneven layers. Make sure that you only use special greases or oils that are suitable for the galvanising process. With thorough surface preparation and careful treatment with grease or oil, nothing will stand in the way of a successful DIY project.
Carry out the galvanising process
Before you start galvanising, make sure you have all the necessary materials and tools to hand. These include a zinc anode set, a DC power supply, a plastic container, zinc electrolyte and gloves to protect against chemicals. First, you need to thoroughly clean and degrease the object to be galvanised to ensure optimal adhesion of the zinc layer. Then connect the object to the DC power supply as a cathode and immerse it in the zinc electrolyte. The zinc anode serves as an anode and releases zinc ions, which are deposited on the object and form a protective layer. The longer the object remains in the electrolyte, the thicker the zinc layer becomes. After galvanising, the object should be thoroughly rinsed and dried. With a little practice and patience you can do a professional zinc coating at home.
Aftercare of the parts after galvanising
After you have successfully galvanised your parts, it is important to treat them properly to ensure their durability and aesthetics. First, rinse the parts thoroughly with water to remove excess zinc residue. Then you can clean them with a mild detergent and a soft cloth to remove any dirt residues. Afterwards, you should let the parts dry thoroughly before you seal them with a protective layer. A special spray or a wax or oil sealant is suitable for this purpose. The protective coating protects the parts from corrosion and gives them a shiny appearance. Note, however, that the after-treatment can vary depending on the type of parts and the galvanisation. Therefore, find out the recommended steps for your specific project beforehand.
Avoid DIY galvanising mistakes
If you decide to galvanise your DIY project, there are a few mistakes you should avoid to get the best possible results. One common mistake is not cleaning the item to be galvanised properly. It is important to remove all grease and oil residues, as these can affect the adhesion of the zinc coating. Removing rust and other contaminants is also an important step to achieve an even and durable zinc coating. Another mistake is insufficient preparation of the electrolyte solution. It is important to use the right amounts of zinc and hydrochloric acid to ensure optimal conductivity. Choosing the right current is also crucial to achieve an even zinc layer. If you avoid these mistakes, you can be sure that your DIY galvanising project will be a complete success.
Conclusion: Do-it-yourself galvanising - a rewarding DIY project!
Conclusion: Galvanising yourself - a worthwhile DIY project! In summary, galvanising yourself is a worthwhile DIY project. Not only is it cheaper than hiring a professional service provider, but it is also a great way to familiarise yourself with the technique of galvanising. With a little practice and patience, even beginners can quickly achieve good results. However, it is important to take the necessary safety precautions and follow the instructions. So anyone who is looking for a new DIY project and is interested in metalworking should definitely give galvanising a try.
- How can you coat on zinc (including Zamak)?
-
Electroplating on Zinc or Zinc Die-Cast
If zinc (e.g. zinc die-cast or galvanized surfaces) is already present as a substrate and an additional electroplated layer (e.g. copper, nickel, chrome, etc.) is to be applied, slightly different requirements apply than for steel. Zinc is a relatively reactive metal and can be quickly attacked by strong acids or alkalis. It also tends to form oxides, which can make good adhesion difficult. Therefore – especially with zinc die-cast – a so-called “strike” (adhesion-promoting layer) is typically used to ensure reliable adhesion for the subsequent top layer. An alkaline copper electrolyte is used as the strike layer.
Below is a recommended process sequence for electroplating on zinc or zinc die-cast:
-
Cleaning / Degreasing
Purpose: Removal of grease, oils, and other contaminants.
Notes: Use suitable (mild) cleaners, as zinc can be attacked in strongly alkaline media. Usually an immersion bath process, possibly supported by ultrasonic or spray cleaning. -
Rinsing
Purpose: Removal of cleaner residues to avoid contamination of subsequent baths.
Tip: Multi-stage rinsing (cold or warm water) is often advisable to thoroughly clean the surface. -
Light Pickling / Activation (Conditioner)
Purpose: Removal of thin oxide layers and activation of the zinc surface.
Conditioner: Special, mildly acidic bath, lightly diluted (according to manufacturer’s instructions), to gently treat the zinc surface without excessive attack. -
Short Rinse
Purpose: Removal of pickling or conditioner residues to avoid contaminating the following baths.
-
Strike Layer (Alkaline Copper Electrolyte)
Purpose: Application of a very thin but strongly adhesive metal layer as a base for the subsequent coatings.
Alkaline copper electrolyte:
- Provides good adhesion on zinc if the surface is properly prepared.
- Is more environmentally friendly and safer than cyanide-containing baths. -
Main Coating
Options:
- Additional copper layer (acidic) for conductivity and smoothing.
- Nickel for corrosion protection and hardness.
- Chrome (after nickel) for gloss and wear resistance.
- Other metals or alloys (e.g. brass, tin, bronze) as required. -
Rinsing / Post-Treatment
Purpose: Removal of electrolyte residues and additives.
Optional: Passivation or sealing for additional corrosion protection or special appearance. -
Drying / Final Inspection
Drying: Centrifuge, warm air oven, or similar to prevent water spots.
Final: Visual inspection, measurement of coating thickness, and adhesion tests.
Summary of Process Steps
- Degreasing / Cleaning
- Rinsing
- Light Pickling / Activation (Conditioner, diluted)
- Rinsing
- Strike Layer (Alkaline Copper Electrolyte)
- Main Coating (e.g. Bright Copper, Nickel)
- Rinsing / Post-Treatment
- Drying / Final Inspection
-
- The power supply unit does not display anything or does not reach the voltage
-
The power supply units regulate the current flow via the voltage, which is a result of Ohm's law. If no load is connected, no current can flow.
If the current limit is set to zero, the voltage will also drop to 0.
Setting the voltage
- Turn the voltage coarse and fine control until the desired output voltage is shown on the display
- Make sure that the set voltage does not exceed the maximum supply voltage of the load to be operated
- If the voltage cannot be increased any further, the current limit is probably set too low, increase it
- The current flow then results from the ohmic resistance
Setting the current limit
- Set a very low voltage of approx. 1 V- to avoid sparking and create a short circuit with the connected test leads
- The power supply unit then switches from constant voltage mode to constant current mode (the display shows C.C instead of C.V)
- Now turn the coarse and fine current control until the desired output current is shown on the display
- Once the current limit has been successfully set, the short circuit can be released again
- Then increase the voltage back to the desired value
- When you work with the current limitation, the voltage is reduced according to the applied resistance
If no power is flowing, check the connection.
- Black sludge forms or the coating becomes matte
-
Black sludge forms, or the deposition becomes matte.
When black sludge forms in electroplating, or the coating becomes matte, this may indicate several problems in the electroplating process. Here are the most common causes:Excessive current (overcurrent):
- Symptom: Formation of black sludge or a matte, uneven surface.
- Cause: If the current is set too high, metal particles may deposit too quickly, leading to a coarse, porous, or even black deposit. This is particularly common when the current density (current per area) is too high.
- Solution: Reduce the current or voltage to achieve a more uniform and smoother metal deposition. (However, note that in some electrolytes, the layer may also become matte if the current density is too low).
Poor cleaning of the workpiece:
- Symptom: Uneven, matte coating or black spots.
- Cause: Contamination, oxidation, or grease on the surface of the workpiece can disrupt proper metal deposition, leading to defects in the coating.
- Solution: Thoroughly clean the workpiece before immersing it in the electrolyte bath. Remove all grease, oxide layers, and dirt through thorough washing, grinding, and rinsing.
Incompatible workpiece material:
- Symptom: Black sludge in the electrolyte or a matte coating.
- Cause: If the workpiece material is not suitable for the electrolyte used, it may dissolve and contaminate the electrolyte, resulting in poor coating and unwanted deposits.
- Solution: Ensure that the workpiece material is compatible with the electrolyte used. Check the material composition and select a suitable electrolyte to avoid chemical reactions that cause contamination.
Inadequate electrode positioning:
- Symptom: Black deposits in certain areas.
- Cause: Uneven current distribution due to poor positioning of the anode or cathode can lead to excessive metal deposition in certain areas, resulting in black sludge.
- Solution: Ensure that the electrodes are correctly positioned and that the current is evenly distributed. Check the spacing between the electrodes and the position of the workpiece in the bath.
Excessive plating time:
- Symptom: Matte or dark coating.
- Cause: If the workpiece remains in the electrolyte bath for too long, it can become oversaturated, resulting in a matte or even black layer.
- Solution: Reduce the plating time and regularly monitor the process to ensure that the desired layer thickness is achieved without affecting the surface.
Incorrect electrolyte temperature:
- Symptom: Matte or black deposits.
- Cause: Temperature deviations can change the speed of the chemical reactions in the electrolyte, affecting the quality of the coating.
- Solution: Check and regulate the temperature of the electrolyte to ensure it remains within the optimal range for the specific electroplating process.
Summary:
Black sludge or a matte coating during electroplating is often the result of excessive current, insufficient cleaning, unsuitable workpiece material, uneven current distribution, or temperature issues. Adjusting these parameters can significantly improve the quality of the coating.
- The chrome deposition turns dark
-
It is normal for chrome to appear dark in the initial stages of deposition. This is because the chromium layer is initially very finely crystallised, which means that the light is reflected differently and the surface appears dark. As the deposition progresses, the crystals increase in size and the layer gradually becomes lighter and takes on the typical chrome colour.
It could also be that the current density is too high. If the current density is too high, the chromium layer will deposit too quickly and unevenly, which can also lead to a dark or black surface. A lower current density ensures more even crystal formation and therefore a lighter and more even chrome layer. A compromise between speed and quality must be found here.
Another important point is that the electrolyte becomes too warm due to the high current density. Too high a temperature also leads to dark colouring of the layer. In this case, the current density would have to be reduced or the deposition interrupted.
- The coating on stainless steel does not hold
-
If the coating does not adhere to stainless steel, the reason is usually inadequate pre-treatment. Stainless steel forms an invisible oxide layer on contact with air within a few seconds, which protects the metal from chemical reactions but also significantly impairs the adhesion of coatings.
To ensure a long-lasting coating, it is crucial to prepare the workpiece with a Nickel-Strike. This electroplating activator removes the oxide layer and the chromium contained in the stainless steel alloy and forms a thin, adhesive nickel layer as the basis for further coating.
Alternatively, a gold strike (gold flash) can also be used to achieve similar results.
- No nickel is deposited on iron
-
A little patience is required as nickel is deposited quite slowly. The current density may be too low, in which case it would take much longer. However, there should not be too many gas bubbles, otherwise black stripes could form.
The big disadvantage is that the nickel formation is also very difficult to recognise.
Also check the polarity of the anode again, this must be positive, while the object to be coated must be negative.
- Payment options
-
You can complete your purchase with us using the following payment methods:
- ApplePay
- Bancontact
- Belfius
- EPS
- KBC
- Klarna
- Credit card
- PayPal
- Prepayment (by bank transfer)
The available payment methods may vary depending on the country of delivery, the technology used, the cookies selected or the contents of the shopping basket.
- Shipment
-
Here you can find the shipping cost table.
For small and lightweight items, shipping can be done as a Small packet (up to 1 kg). Please note, however, that the “Small packet” option may sometimes take a bit longer to be delivered. The usual delivery time within the EU is typically around 3–7 days.
Country Parcel post Small packet Belgium, Denmark, France, Luxembourg, Monaco, Netherlands, Poland, Czech Republic, Austria 12,00€ 6,90€ Italy, Sweden, Slovakia, Slovenia, Spain, Hungary 12,00€ 6,90€ Bulgaria, Croatia, Estonia, Finland, Greece, Hungary, Ireland, Latvia, Lithuania, Portugal, Romania, United Kingdom 13,00€ 7,50€ Liechtenstein, Switzerland 17,00€ 7,90€ Norway 19,00€ 7,90€